• About Us
  • Contact Us
  • Disclaimer
  • Privacy Policy
  • Terms and conditions

Guide Me Tech

Your guide in every aspect of Technology

  • Home
  • How to
  • Android
  • IOS
  • Mac OS
  • Windows
  • Gadgets
  • Softwares

How to enter and exit download mode (Odin mode) in the Samsung devices

April 7, 2020 by admin

Hello Guys in this guide I am going to write about how to enter and exit download mode in the Samsung devices. If you are a Samsung user and looking to factory reset your device then there is a chance that you enter into download mode accidentally. This download mode is called as Odin mode. I think most of the people know about this term but for those who don’t know here are a few lines for them.

What is ODIN mode and how to use ODIN mode?

ODIN is a German name which is usually referred to as the king of all Gods in German mythology. The same applies to Samsung technology here. ODIN is a simple program that lets a user flash whatever he wants in the internal memory of the device. All he needs to do is to download flash file might be a custom ROM and use a USB cable along with a PC to flash the file onto the memory. I will publish about the flashing process later. So let’s get to know how to enter into download mode

How to Enter download mode in your Samsung device:

In order to enter download mode in your Samsung device follow this method. In some models, you need to press the VOLUME UP + HOME + POWER BUTTONS at the same time.

You have to press for the next 10 or 15 seconds until the download icon appears on your device screen. Now you are in download mode.

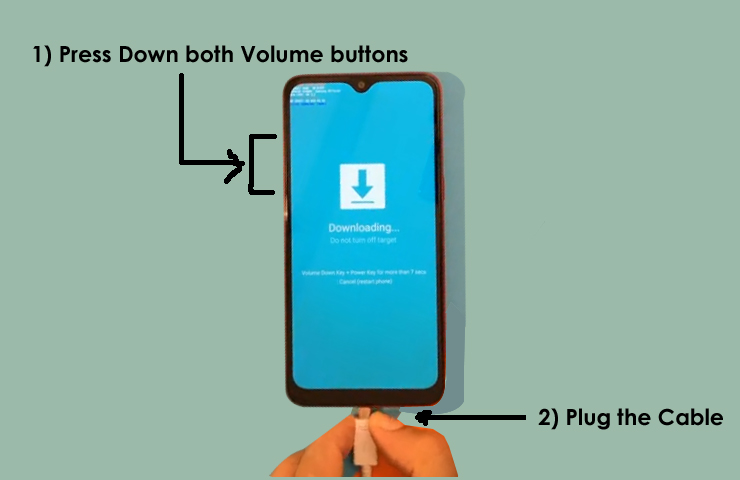
In some advanced models, you need to press both volume buttons and simply plug in the USB cable into the port. The device will automatically enter into the download mode.

Once you enter download mode press VOLUME UP or DOWN keys to continue. You can use software like ODIN and HEIMDALL to flash custom ROM in the internal memory of the phone. Before you start flashing make sure that you uninstall Samsung Kies. Also, there are a lot of Softwares available in the market that can help you enter download mode. Just google you can find them easily. If any of the buttons won’t perform then that software might come handy. You can check software from wondershare

How to Exit download mode in Samsung device:

If you got into download mode either intentionally or accidentally. Some people might have to enter in the recovery mode in order to factory reset. But they accidentally enter download mode. Don’t worry you can come out of download mode by simply pressing the VOLUME UP & DOWN +HOME + POWER buttons at the same time. The device may get blank or reboot normally. In case if your device gets blank press the power button.

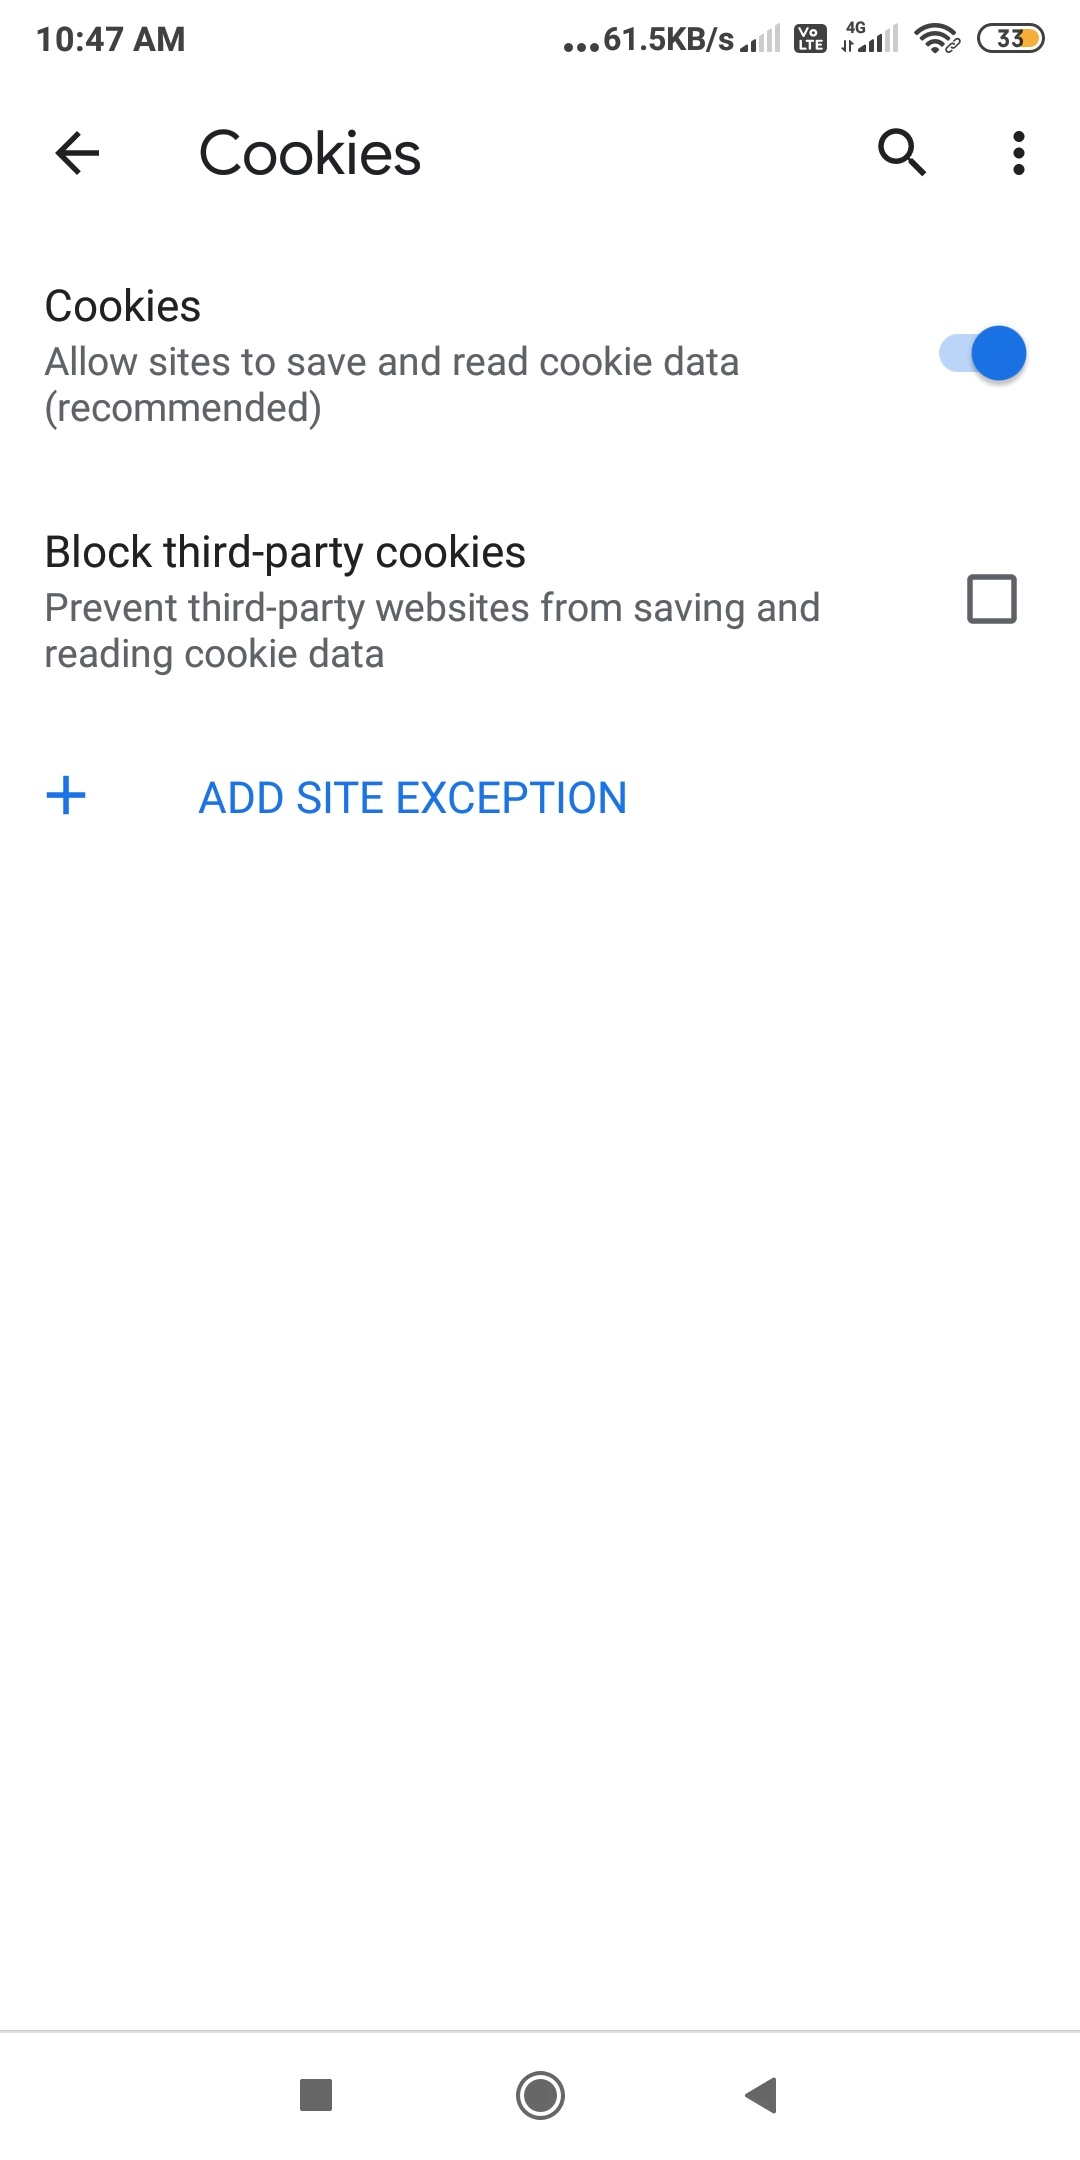
Also Read: How to enable cookies on android

This is how you can exit download mode in your Samsung device. I suggest you not use ODIN and flash custom ROM on your mobile. There may be a chance that your phone might brick. It will cost more to repair your phone. So make sure you don’t install custom ROM in your device.

If you still have trouble in entering or exiting download mode then let us know in the comments section below. The next time when your friend asks you how to enter and exit download mode then share this guide with him.

Filed Under: How to Tagged With: How long does odin mode take, How to come out of download mode, How to enter and exit download mode, How to enter into download mode, How to use odin mode

How to enable cookies on android phone

April 4, 2020 by admin

In this guide, we are going to write on how to enable cookies on android phone. You might have read or heard about these cookies whenever you start browsing a website. Most of them know about these cookies but for those who don’t know here is some info about cookies.

Cookie is a small piece of data that is stored in the user’s browser. These cookies will gather the browsing activity, items added in the cart and collect much more information about the user. There are different types of cookies like session cookies , persistent cookies, authentication cookies and third party cookies. They collect information like whether the user logged in or not, his browsing time etc and send them to the web Server. They are very valuable for the site owners.

So without wasting any time let’s know how to enable cookies on android phone.

How to enable cookies on android phone:

Most of the android users have different types of browsers installed. I am going to cover each and every browser that is used on an android phone.

Enable Cookies in Google Chrome app:

Google chrome is the most popular and the most downloaded app all over the world. If you are one among them then follow this step by step guide in order to enable cookies in your google chrome app.

  • Open Google Chrome app in your android phone
  • Click on the three dots ⋮  that are present on the top right of your screen
  • A drop-down menu will appear then click on SETTINGS
  • Scroll down a bit, under advanced settings click on the SITE SETTINGS option
  • Click on COOKIES now turn on the button where it asks allow sites to save and read cookie data. For better understanding, I am sharing a screenshot taken in my mobile here.
  • enable cookies in google chrome app
  • You can also allow or prevent third-party websites from saving and reading cookie data.

This is how users who are using google chrome app in their android device enable cookies. If you are not using this browser you can simply download it from the Google play store

Enable cookies in Mozilla Firefox app:

Mozilla Firefox known for fastness and privacy is also one of the most popular browsers. If you are Mozilla Firefox user then you can simply follow this step by step guide in order to enable cookies

  • Open Mozilla Firefox app and then click on the three dots ⋮ that appear on the top right corner of your screen.
  • A drop-down menu will appear, Click on SETTINGS
  •  Tap on PRIVACY
  • Click on COOKIES, a pop window will open where you can enable cookies.

This how you can enable cookies in your Mozilla Firefox app. There is also one more version of Mozilla Firefox named Mozilla Firefox Lite. It is a lightweight browser made by the developers. The process of enabling cookies might also be the same.

Also Read: How to view browser history in incognito mode

Enable cookies in Opera Mini Browser:

It is also one of the most popular browsers used in android devices. In some basic android devices it comes as the built-in default browser. You can now simply follow this guide to enable cookies in your Opera mini browser.

  • Open your Opera Mini browser and tap on the Opera logo which is present on the bottom right of your screen.
  • A small window will open where you can find the SETTINGS option which is indicated by a gear icon.
  • Click on the ADVANCED option by scrolling down.
  • Now you can see the COOKIES option click it
  • How to enable cookies in Operamini browser
  • By default it is enabled you can disable and re-enable it according to your wish.

Enable Cookies in Samsung and Mi phone Browser:

Samsung and Mi considered one of the best brands all over the world. If you are a Samsung mobile user you can simply enable cookies in the browser by following these steps

  • Click on the Browser
  • Tap on the three dots present on the top right of your screen.
  • Click on SETTINGS
  • Click on PRIVACY & SECURITY
  • Under ACCEPT COOKIES can enable or disable.

This how you can enable or disable cookies in the default browser of a Samsung or Mi mobile. I am writing this guide by checking the basic models. I think the process may remain the same for higher models also.

UC Browser:

Well this Chinese browser is lightening fast but the cookies come auto enabled in this browser. We don’t have any option to enable or disable cookies in it. All we can do is clear the cookies which we can do by simply following this guide.

  • Open UC browser
  • Click on the three horizontal lines which are present on the bottom of your screen
  • A Pop Menu will appear where you need to click on the Gear icon, which is considered as Settings
  • Scroll down a bit and click on the Clear Records option
  • A pop window will appear where you have to select Cookies in order to clear them

This how you can clear cookies in a UC browser. If you need any help in enabling or disabling cookies any of the browsers mentioned above you can simply comment down below. We will reply and help you as early as possible.

Filed Under: How to Tagged With: How to enable cookies on android, how to enable cookies on android Phone

How to setup hotspot in iPhone

February 7, 2020 by admin

Congratulations on your first iPhone. If you are a new iPhone user and don’t know how to setup hotspot in iPhone then you are on the right page. If you follow this step by step guide you will be able to enable personal hotspot on your iPhone. You can easily set up a personal hotspot, connect other devices and browse the internet. Without wasting any time let’s go through the guide

How to setup Personal Hotspot in iPhone

Before we create our personal hotspot network, we will know about the encryption done to secure our network. WPA2 is the best encryption type to secure your network and apple does it automatically for you. There is no need for selection of encryption in setting up the personal hotspot. Here is how to set up a personal hotspot in your iPhone so that it can work as a wifi router.

  • Turn ON mobile data or cellular data by going to the settings in your iPhone
  • Now go to Personal hotspot and tap it to turn it green
  • If asked to turn On wifi/Bluetooth then turn it on
  • how to setup personal hotspot in iPhone
  • Tap the wifi password and enter a suitable password. Make sure you note down this password in a secure place. This is the password others has to enter in order to join your personal hotspot
  • Tap on allow others to join so that others can connect to your hotspot
  • Also, make sure that you enter a strong password. A password with 10 letters has numerical numbers, symbols and capital letters
  • In case if someone tries to hack your network then it will be difficult to decode the password.

Now you have enabled personal hotspot in your iPhone and let’s see how to connect different devices to this network. If you are using a Mac, iPhone, iPad or any other device then turn on wifi in your device.

Also Read: Safari Can’t find the server issue solved in mac os

Under wifi, the name of your personal hotspot will appear under the networks. Select the one which you have created. Tap it and enter the password. Now you will be connected to the network and browse the internet in your device.

This is how to setup hotspot in iPhone. If you got any queries do let us know in the comment section below. Thank you sharing is caring.

Filed Under: How to, IOS Tagged With: how to configure personal hotspot in iphone, How to enable personal hotspot in iphone, How to setup hotspot in iPhone

Safari Can’t find the server issue solved in mac

February 1, 2020 by admin

If you are facing safari can’t find the server issue then you are at the right place. Most of the Mac users are reporting that they are not able to connect to the internet using the safari browser. It will greet with a message that Safari Can’t find the server every time you try. This is where our guide comes handy in solving the issue.

Before we start let’s know the possible reasons behind why the browser won’t be able to connect to the internet.

  • First of all check with the URL. There may be a possibility that the entered URL is wrong.
  • Check you have good internet connection

Sometimes even though you are connected to a wifi network you won’t be able to browse the internet. You will be greeted by Safari Can’t find the server message when you start browsing for one or more websites.

In such cases, you need to check the data plan validity. Check with other devices that are connected to the network. Are you able to connect and browse the internet in those devices? If you are successfully browsing the internet in other devices then the problem is with the safari browser in your Mac. All you need to do is simply follow these steps below

Safari Can’t connect to the server

Before we start make sure that your wifi network is turned on and working now in your Mac follow these steps

  • Click on the wifi icon on the menu bar of your Mac which is on the top right side of your screen
  • Open network preferences
  • In the network window select the wifi and delete it by clicking on the minus (-) button on the bottom of the window
  • Safari Can't connect to the server
  • Click on Apply now there will be no wifi network displayed
  • Now we are going to add the wifi network back again. For that we have to click on the Plus (+) button
  • After that select wifi and click on create. Now the available wifi networks will be displayed on your menu bar
  • Now select your preferred network and then connect it by entering a password for that network.

That’s it now you will be able to connect and browse the internet. We just deleted the wifi option and created it back so that the wifi network will reset its network setting to the default. Any issues with your wifi settings will get sorted out with this technique.

In case if you are an amazon fire tv stick user then check our guide on How to do screen mirroring in amazon fire Tv Stick.

If any of our readers solved Safari can’t connect to the server issue in another way. Do let us know in the comment section below. Also if you got any queries or suggestions feel free to take time and ask us in the comments section below. We will get back to ASAP. Thank you sharing is caring.

Filed Under: How to, Mac OS Tagged With: safari could not connect to the internet, safari not working with wifi

How to do screen mirroring in amazon fire Tv Stick

January 31, 2020 by admin

In this guide, we are going to write on how to do screen mirroring in an amazon fire Tv stick. I bought an amazon fire tv stick a few months ago. Believe me, this is the best gadget till date which I had purchased in terms of online entertainment.

If you too got an amazon fire tv stick and don’t know how to do screen mirroring then this guide is for you. We are going to write on how to screen mirror amazon fire tv stick with android as well as ios mobiles. So Without wasting any time lets get onto the topic.

How to screen mirror android phone to amazon fire tv stick

Screen mirroring from an android phone to amazon fire tv stick is easy. All you need to worry is that your phone must have the inbuilt option of screen sharing or casting. This option is present with different names in different mobile models.

Also Read: Is your iPhone not ringing when calls come in. Here’s a quick solution

In xiaomi Redmi mobiles you can find it as Cast screen. In Samsung and other models you can find it as screen share and in some other models like Meizu you can find it as miracast. All these options work the same and they simply display your mobile screen on to the larger screen. Here’s how to screen mirror android phone to amazon fire tv stick

  • Before we start make sure both your android phone and amazon fire tv stick are connected to the same wireless network.
  • Go to your mobile settings and turn on the cast screen option (This option is termed differently in different models)
  • Now turn on your amazon fire tv stick and long-press home button in your remote. A screen will pop up like below
  • Amazon fire tv stick screen mirror option
  • You can find an option by name mirroring click on it.
  • You can also do it by going to settings > under the display and sounds > enable display mirroring.
  • This will make amazon fire tv stick discoverable to nearby devices.
  • Now in your mobile under wireless display tap the fire tv stick. Your screen will now mirror onto the tv in just a few seconds.

In some mobile models, you don’t need to connect to the same wireless network. You can simply turn on the data and wifi hotspot and connect your fire tv stick to the mobile hotspot and follow the above steps. If it does not work then make sure both the devices are connected to the same wireless network.

How to screen mirror iPhone to amazon fire tv stick

If you are an iPhone user and looking to screen mirror to amazon fire tv stick then you landed on the correct page. Usually, an iPhone doesn’t connect directly to any device unless it has a built-in airplay feature. We have to install a third-party app in the fire Tv stick. Follow these steps in order to do screen mirroring with your iPhone device.

  • Connect both your iPhone and fire tv stick to the same wifi network
  • In fire tv stick install an app called Airscreen
  • This app will let screen mirroring any ios as well as Android device on to the amazon fire Tv stick.
  • Once you have installed this app open its setting and under device name enter a name for your fire tv stick.
  • Now in your iPhone click on the screen mirror option.
  • How to do screen mirroring in an amazon fire tv stick
  • Under it, you will find the name of your fire Tv tap on that. Your mobile screen will now start appearing on the Tv

That’s it now you may have learnt how to do in an amazon fire tv stick using android as well iPhone. If you got any queries or any working idea through which you are able to screen mirror amazon fire tv stick using your android device or iPhone do let us know in the comment section below.

Filed Under: Android, Gadgets, How to Tagged With: amazon fire tv stick screen mirroring, How to do screen mirror iphone to amazon fire tv stick, How to do screen mirroring in amazon fire tv stick

How to convert vcf files to excel in windows

January 17, 2020 by admin

In this guide, we are going to know how to convert vcf files to excel in windows. If you don’t know what is a VCF file then here are some lines for you. VCF stands for Virtual Contact File which is a standard file format for electronic business cards.

Usually, You will get this file whenever you export your contacts from mobile to any external SD card or Hard disk drive or any other storage. If you are gonna use this file in any software then there will be a need to convert these files to excel sheet.

In my case, I have to send bulk SMS to all the contacts in my phone. You can send SMS to a limited number of contacts but for 540 contacts it will take time. That’s why I had opted for Bulksms for sending messages instantly with just a single click. I had to convert them into excel file so that the messages can be sent instantly.

How to convert vcf files to excel in windows

There are two to convert vcf files to excel. One is to convert with the help of using gmail and the other is to use a software either it be online or offline.

Vcf to excel using Gmail:

If you are exporting your contacts from your phone then make sure that you got your Gmail synced with your contacts before you export. Here’s a step by step guide on how to convert vcf files to a single excel file with columns.

  • Open your gmail click on the google apps or the 9 dots that are present on the top right near your profile picture or letter, in case if you hasn’t uploaded one
  • vcf to excel
  • Click on the export option which is present on the left side of your screen
  • Now select under google csv or outlook csv and click on export. All your contacts will now be exported as an excel file now with seperate columns.

This is how you can convert vcf files without using any software. In case if you are converting your friend’s or an unknown person’s Vcf files then you can simply use any software or an online convertor.

Also Read: Amazon Fire Tv Stick not turning On, 5505 and Plr Prs issues resolved.

There are no much offline softwares present that converts vcf files to excel but one such software is vcard2xls software. It is still under development mode and hasn’t been updated yet. You can combine mulitple vcf files into one by using this software. Right now it is only available for windows users only. Mac users need to wait for some more time.

Apart from this offline software there are lot of online programs that convert your vcf files to excel. All you need to do is a simple search in Google. But the privacy of the data you upload is not guaranteed. The data must be uploaded and stored in the server before the conversion process begins.

I will be updating this post with new convertors as well as new methods. Feel free to comment down below if you need any help or got any query. Thank you.

Filed Under: How to Tagged With: How to convert vcf files to excel in windows, vcf files to excel, vcf to csv, vcf to excel

plr_prs_call_failed Amazon Fire Tv, 5505 and fire Stick not turning On

January 11, 2020 by admin

In this guide, we are going to know about various issues that arise while using the amazon fire tv stick. We will cover plr_prs_call_failed issue and Amazon Fire Tv Stick not turning On error 5505. Amazon firestick has been a revolution in online streaming content ever since it was launched. Most of the people who don’t know about Fire Tv stick, here are some lines for you.

What is the Amazon fire Tv stick?

Fire Tv stick is a plug and plays dongle that needs active internet connection in order to play online content. It can convert any normal tv to smart Tv. All you need is just an HDMI port on the back of your Tv.

You have to plug it in the HDMI port and connect to an active internet connection probably wifi. After that, you have to download apps like youtube, Netflix, and amazon prime video. There is an inbuilt AppStore from where you can download apps according to your needs. Ok, let’s see some of the issues that arise while using amazon fire tv stick.

Amazon Fire Tv Stick not turning On

  • If you are amazon fire tv stick is not turning On make sure that the adapter is rightly plugged in the socket.
  • Select the exact HDMI port as the Input source from your remote.
  • If you are still greeted with a blank screen try changing the HDMI Port.
  • Disconnect the Fire Tv stick from the HDMI port and plug it back in.
  • Try checking the adaptor as well as the USB Cable. Restart the Firetv stick by simply pressing down the play/pause button for 5 seconds. You can also do this by going to the settings> Device > My Firestick.

Also Read: How to play .dav file on mac, mobile, and Windows PC

Amazon fire tv stick Plr_Prs_call failed issue

In case if you are facing Plr_Prs_call_failed issue while playing a movie in amazon prime video then simply follow these steps.

  • Open settings
  • Click on Applications and select manage installed applications
  • Select Amazon Prime Video and clear data and Cache of this application
  • Now goto home play the movie of your choice from the amazon prime video

This is how to solve plr_prs_call_failed issue in Amazon Fire Tv stick

Amazon Fire Tv stick error 5505/1055 resolved.

If you are getting error 5505/1055 in your amazon fire tv stick then simply follow these steps.

  • Goto www.amazon.com
  • Under account & lists click on your Content and devices
  • Click on settings which is on the top right after your devices tab
  • Click on country settings option
  • Enter your delivery address.

You can also update this on the Amazon mobile app. If you haven’t purchased this amazing dongle do get one from here BUY AMAZON FIRE TV STICK ONLINE. If you need any help in connecting and setting up your fire tv stick do let us know in the comment section below. You can also reach to us in the comment section if different issues arise.

Filed Under: Gadgets, How to Tagged With: amazon fire tv stick 5505 error, amazon fire tv stick issues, amazon fire tv stick not turning on, Plr-Prs-Call_Failed issue in amazon fire tv stick

How to play .dav file on mac, mobile, and Windows PC

January 3, 2020 by admin

Hello Guys, this is my first post on guide me tech blog. Today in this article I am going to write about how to play .dav file on mac, mobile, and Windows PC.

First of all, before we go onto the post let’s know about .DAV file extension. If you are using a CCTV camera in order to monitor the security of your surroundings then most probably the output of this camera will be a video with .dav extension. The Digital video recorder connected to the camera will encrypt the video and gives the .dav file. I am going to guide you on how to play .dav file in the following devices

How to Play .dav file on MAC

If you are a Mac user and don’t know how to play .dav file on Mac then for your info standard video players will not play .dav files on MAC. There is also a thread in the apple community where most of the Mac users are asking for a DAV player on Mac. Yet there is no official DAV player released by Apple.

The solution to this issue is to use a video converter that converts from .DAV format to other formats like MP4/MOV/AVI etc. I am going to name some of the converters that work well on Mac Os. You can use Total Video Converter, Any video converter, wonder share video converter, and some other online converter too. These are totally free to some extent when the size of the video exceeds you need to buy the premium.

If you are looking for a free .dav media player then you can install the VLC Player on your Mac and play the file by making some tweaks in the settings. Let’s get to know how to play .dav file on the VLC media player

Open VLC Media player > Click Tools > Click CTRL +P or click Preference option > Click Video > Select ALL under show settings in the bottom left > under Input/ Codexes select Demuxers >Under Demux Module change Automatic to H264 demuxer. Now you will be able to play the .dav videos on your MAC for free.

How to play .dav file on Mac
Demux to be changed to H264 Video from Automatic

Note: Make sure you revert back to Automatic from H264 video Demux settings once after you finish off watching .dav extension files. Nevertheless, the videos won’t play as usual you will be greeted with a blank screen all the time.

Play .dav file on android and Windows

Android and Windows users can get a variety of software installs and one such software is DVR365 player. In order to play the .dav extension file, you can also convert the file to Mp4/MOV/AVI or any other formats of your wish. If you got a VLC player on your device you can simply change the demux settings and watch the video. After that don’t forget to change the demux settings to automatic.

If you got any queries or suggestions do let us in the comment section below. I will try to help ASAP. Thank you.

Filed Under: How to Tagged With: how to play .dav file in my pc, How to play .dav files in android, How to play .dav files on mac, How to play. dav files in vlc player

  • « Previous Page
  • 1
  • 2
  • 3
  • 4

Join GUIDEMETECH.COM now

Be the first to get every post to your inbox. Never miss an update from us

Softwares

Best Video Editor App for PC | CyberLink Power director free Download

In this … [Read More...]

Best PDF editor for windows 10 |Ashampoo Pdf Pro 2 Download

If you are … [Read More...]

More Posts from this Category

Recent Posts

  • Fire Stick not working? Here’s what you can do
  • Turn off this call is being recorded Announcement on Android
  • How to record incoming call on iPhone without app
  • Something went wrong please try again later Instagram error solution
  • Do your mouse automatically double clicks? Here’s a fix

Categories

  • Android (4)
  • Gadgets (8)
  • How to (38)
  • IOS (5)
  • Mac OS (2)
  • Softwares (2)
  • Windows (2)

Copyright © 2023 · News Pro Theme on Genesis Framework · WordPress · Log in