Looking to extract zip or RAR files in google drive and don’t know how to do then you are on the right page. In this guide, I am going to show you how to extract zip/RAR files in google drive. Today one of my friends sent me a large file on google drive.
When I tried to check the contents of the file it was not opening in google drive. He sent me a RAR file. When I tried extracting the files I was not able to do so. After going through the google community forum I got to know that we can’t extract compressed files inside google drive.
You have to download the files in your PC and then extract the files. In case if you want to archive a folder you have to do it on your PC then upload it to your Google drive. Without the need to do anything on PC, I am going to show you the method by which you can compress and extract files in google drive.
Extract zip or RAR files in google drive using ZIP Extractor App
Let’s start with the zip files. If you want to extract a Zip or Rar folder inside google drive then simply follow these steps.
- Open your Google Drive account
- Click on the New option on the top left corner of your screen.
- Click on More and then click on Connect more apps.
- A google market place window will open where you need to search for the app called Zip extractor.
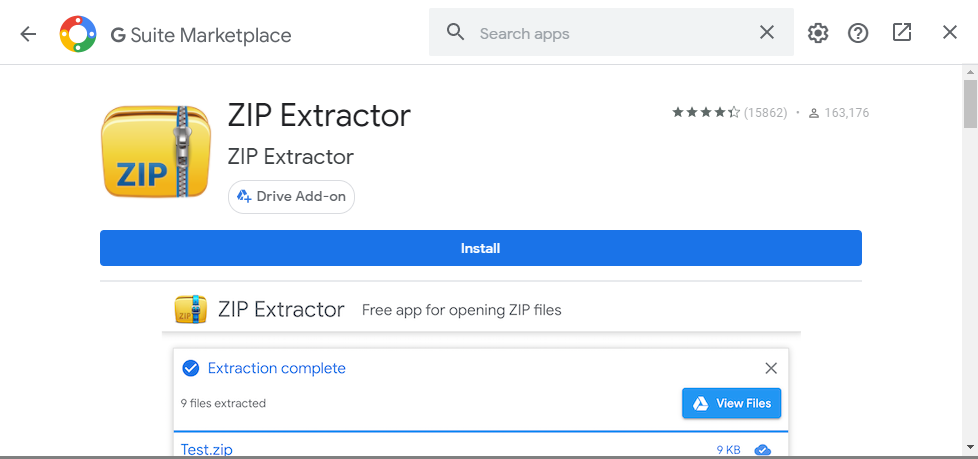
- Click on the install button and then connect it with your Google account.
- Once after the successful connection, you can use the app to extract the Zip or Rar files.
- In case if the app asks for any permissions simply grant them.
If you are using google drive on mobile and not able to install the app. You can get this app by switching to the web version in your mobile. Switching to the web version will allow you to install the app.
Extract using online portals
Many online portals will help you extract the Zip or RAR files in your Google Drive Cloud Platform. One such portal is Cloudconvert.com. Here is the step by step guide by which you can compress or extract zip files in your Google drive.
- Go to cloud convert and click on the drop-down arrow on the right of select files
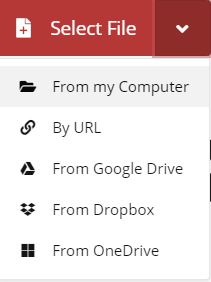
- Enter your google drive credentials, Select your Zip/RAR file and upload it to the platform
- Once after successful upload, the file will be processed and you will get options regarding what to do with the file under the select options.
- Now under the select option, you need to choose the extract
- Don’t forget to check the box that says save the file to my google drive. Checking this option will extract the file in your Google drive.
That’s it. This is how to extract Zip or RAR files in Google drive. I hope after reading this guide you can now extract compressed files in your Google drive. In case if you find any other way by which you can extract files inside Google drive folder do let our readers know by posting in the comments section.
Also, read: how to know who unfollowed me on Instagram
You can also post a comment if you find any difficulty or not able to extract the files. I will get back to you as soon as possible. Do like and share this guide with your friends and don’t forget to subscribe to our newsletter. Thank you.