In this guide, iPhone users will get to know how to import contacts from Gmail to iPhone. This article is useful for those who got a new iPhone or the one who switch from Android to IOS. We know Apple is unique in adding amazing functionality to its users. Most of the new technologies are introduced in apple devices. let’s get into the topic. You can add contacts from Gmail to iPhone only if you have exported contacts from your old device earlier.
I mean if you got contacts in Gmail you can import them to your iPhone. If not then you can’t. Make sure you save contacts to your Gmail. You need to backup or export contacts to your Gmail account before we start importing into iPhone. Once after you finished off saving contacts to Gmail you can follow these steps in your iPhone.
Import contacts from Gmail to iPhone
Now you have got iPhone in your hand you can import contacts from Gmail to iPhone by simply following these steps. Make sure you have an active internet data plan else connect to a wifi connection
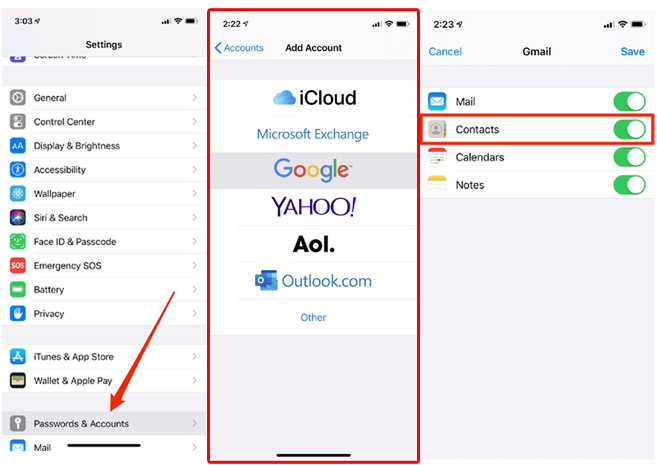
- Open Settings app in your iPhone
- In settings open Accounts & Password
- Click add Google account & select Google account
- Enter email & password and tap on Next
- Turn the Option contacts ON
- Click on the save option which is present on the top.
This is how you can sync contacts from Gmail to your iPhone. In case if you got any issues while syncing contacts you can follow below steps
- Open settings in your mobile
- Now go to Contacts and Tap on accounts
- Tap on Google account and switch contacts ON
- Now Tap on the account and one
- Try adding your account now.
Also Read: How to clear personal information from the Internet
Still, if you can’t import contacts then there might be a problem with the data connection. First, rectify it and then start again. Also, it takes some time to import the contacts from Gmail to your contact list. Don’t panic if it takes time to import. This is how to import contacts from Gmail to iPhone. In case if you got any queries or issues do let me know in the comments section below.