• About Us
  • Contact Us
  • Disclaimer
  • Privacy Policy
  • Terms and conditions

Guide Me Tech

Your guide in every aspect of Technology

  • Home
  • How to
  • Android
  • IOS
  • Mac OS
  • Windows
  • Gadgets
  • Softwares

how to copy files from mac to USB flash drive

April 30, 2020 by admin

Hello, Guys today in this guide I am going to write on how to copy files from mac to USB flash drive. Most of the Mac users may know it well before I publish this article. Yet for those who don’t know about transferring files from Mac to USB flash Drive this guide might come handy for them. So without wasting any time lets’s get to know about it.

Copying files from mac to USB hard drive

how to copy files from mac to USB flash drive

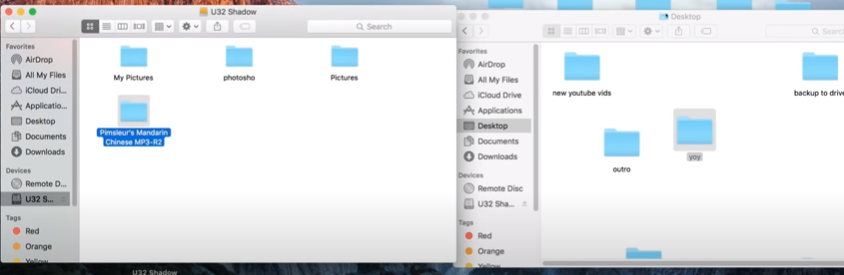
Now when you insert your USB flash drive into the Port your device will be automatically detected and appears on the desktop. In case if it doesn’t appear on your desktop simply go to the devices section and double click on your device name. A new window will open and then simply drag and drop the files which you want to transfer into the window. The files will be transferred to your device. In case if the files won’t transfer then simply follow these steps.

Cannot copy files from Mac to USB Hard drive?

There is a problem with the USB external devices that have an NTFS file system. The files won’t copy if you are using USB flash drives with this system. All you need to do is format those USB flash drives and then use to transfer the files.

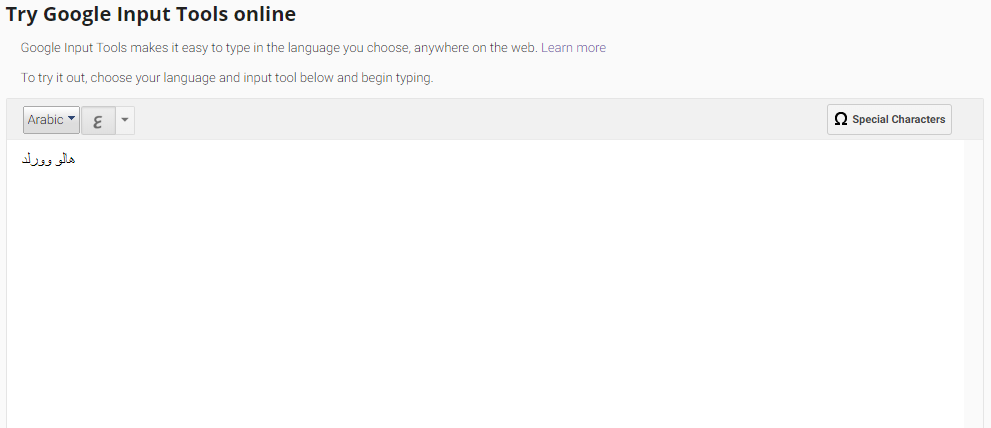
Also Read: How to type in different languages in window 10

How to format USB hard drive in MAC

Simply follow these steps in order to format a USB hard drive with the NTFS file system

  • Open disk Utility
  • Under External tab select your flash drive
how to copy files from mac to USB flash drive
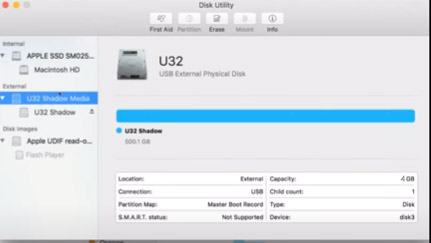
  • Click on the ERASE option present on the top menu bar.
  • A new window will open where you need to enter the name and select the format. I recommend using the ExFat file format. In case if you got heavy files then ExFat file format will become handy.
  • Once after you select the ExFat option click on Erase. Now you will be able to transfer huge files into your flash drive.
  • Now you can use the flash drive with any windows, Linux, mac machines.

This is how to copy files from mac to USB flash drive. Hope you may have successfully copied the files now. If you got any queries do let us know in the comments section below. Thank you sharing is caring.

Filed Under: How to, Mac OS Tagged With: how to copy files from mac to USB flash drive, How to transfer files from mac to pendrive, How to transfer files from mac to usb

How to add someone on WhatsApp from another country

April 19, 2020 by admin

Hey guys, today in this guide I am going to write on how to add someone one WhatsApp from another country. If you are looking to add someone who resides in a foreign country then this guide is for you. I will cover adding someone both for android as well as iOS versions in this guide.

So simply follow this step by step guide in order to add an international contact in your WhatsApp contacts list.

How to add someone on WhatsApp from another country on Android

Here’s how we can add an international contact in our WhatsApp.

  • Open your WhatsApp and make sure you are on the Chats tab
  • Click on the New chat icon which you can find at the bottom right corner of your screen.
  • Tap the New Contact icon at the top of your screen near to the person’s silhouette
  • A new window will open where you need to select the storage location and start by typing the name of the person you want to add
  • The next is the country code, we have to input the country code the person resides. Suppose if the person resides in the US we will input country code as +1 followed by the area code and mobile number.
  • Input email and then save the contact
  • Now close and reopen WhatsApp and search for the contact you just added. International contact will be displayed on your Whatsapp.

This is how you add an international contact in WhatsApp android version. Let’s see how to add a foreign contact in WhatsApp iOS Version.

How to add someone on WhatsApp from another country on iOS

If you are an iOS user then kindly check this guide to add an international contact in your WhatsApp

  • Open WhatsApp, click on the chat icon and then click on the text icon on the top right corner. The same is shown in the pic below
How to add someone on WhatsApp from another country
Image Credits: Imore.com
  • Click on New Contact and then fill up the fields that appear on your screen like First Name, Last Name.
  • Now when you come to the Phone select the country of your contact’s residence. Suppose if you want to add a US contact then scroll and select the US.
  • The country code will be automatically displayed under the mobile field. Enter the contact number in the mobile field that’s it.
  • If you want to add other fields like email, address then click on more fields and fill them. Once you finished don’t forget to hit save option which is present on the top right corner of your screen.
  • Now close and reopen WhatsApp and search for the contact name you just added. If the contact is using WhatsApp it will appear in your contact list else send an invite to join WhatsApp.

This is how to add someone on WhatsApp from another country. Also, read about some questions, please restart chrome cast issue. If you like this guide do share with your friends sharing is caring.

Filed Under: How to Tagged With: How to add an international contact on your whatsapp, how to add foriegn contact on your whatsapp, How to add someone on WhatsApp from another country

How to connect amazon fire stick to mobile hotspot (Android & iOS)

April 17, 2020 by admin

Hello guys, today in this guide I am going to write on how to connect amazon fire stick to mobile hotspot. Most of the mobile users may use either an android device or iOS. So in this guide, I am going to cover how to connect your Amazon Fire TV stick device with Android as well as iPhone hotspot.

How to connect Amazon Fire TV stick with Android hotspot

If you are an android user and looking to connect Amazon Fire TV stick with your mobile hotspot then simply follow these steps

  • In your android device turn on your data as well as a Wifi hotspot.
  • You can enable personal hotspot by going to the Wifi settings in your mobile.
  • Now turn on your TV and amazon fire tv stick.
  • Go to the settings and then click on Network icon
  • Under the Networks check for your mobile hotspot and then click to connect.
  • Enter the password of your Wifi hotspot and then connect to it.

That’s it you can watch online streaming content on your large screen. You can download and install a lot of applications to your Fire TV stick and enjoy.

How to connect Amazon Fire TV stick with iPhone

Now let’s come to the iOS users. If you are an iPhone user and wants to connect your fire TV Stick to your personal hotspit then follow this guide.

  • In your iOS device turn on your mobile data as well as a personal hotspot.
  • Now turn on your TV and amazon fire tv stick.
  • Go to the settings and then click on Network icon
  • Under the Networks check for your personal hotspot and then click to connect.
  • Enter the password of your personal hotspot and then connect to it.

I have seen users complaining about the connectivity issues with iPhone personal hotspot. These issues will arise post iOS update 13. If your firetv stick connecting normally and suddenly after an update if it is failing to connect then follow this guide.

Facing Mobile Hotspot Connection Issues after iOS update (13)? Here’s a quick guide.

Follow this guide in order to solve the connectivity issues arising after an iOS update. All you need to do is check and change the IP, Gateway, Subnet as well as DNS settings.

Amazon fire tv stick
  • On Your fire stick navigate to the Settings
  • Now click on Network and then click Forget your connection
  • Connect to your hotspot again, authenticate, then select ‘Advanced’.
  • Add the IP as 172.20.10.4, Gateway as 172.20.10.1, Subnet as 24, DNS as 8.8.8.8

I hope this will solve your connectivity issues. If you face any problem apart from it do let us know in the comments section below. We will get to you as soon as possible. Thanks for taking time and reading. If you are a Chromecast user and facing connectivity issues do read this guide. Some questions please restart Chromecast

Now the next time when someone like your friend, relatives etc asks you how to connect amazon fire stick to mobile hotspot don’t forget to share this guide with him. Sharing is caring.

Filed Under: How to Tagged With: How to connect amazon fire stick to mobile hotspot, How to connect amazon fire tv stick to mobile hotspot, How to connect amazon fire tv stick to your mobile hotspot

How to boot safe mode windows 10

April 14, 2020 by admin

In this guide, I am going to write on how to boot in safe mode windows 10. Most of the users may know about safe mode but few of them may know about the use of safe mode. When your system OS encounters a problem then safe mode comes to rescue. It will troubleshoot Windows and determine the issues that won’t let windows to work properly.

When Windows fails to load properly then you can it boot in safe mode. Right now if your windows is not loading properly then here is how to boot safe mode in windows 10.

How to boot in safe mode windows 10

There are many ways to boot Windows in the safe mode. Here I am going to note the simplest and most used methods to boot windows in safe mode.

  1. Using Msconfig tool
  2. Using Shift+Restart
  3. Using Shift+F8 keys
  4. Using Automatic Repair mode

Let’s know about each method!

1.Boot safe mode using system configuration tool MSConfig:

You can boot safe mode by following this guide

  • Press win+R keys simultaneously on your keyboard or type RUN in the search bar. A window will pop up as follows.
Windows 10 safe mode
  • Type msconfig in the text field. A system configuration window will open.
System Configuration window
  • Under the boot menu select your Operating system and then checkmark the safe boot option and click OK
  • The system will ask to restart. When you click on the restart button the system will boot in the safe mode now.

Also Check : How to type in different languages in windows 10

This is how to boot in safe mode using the msconfig tool. In case if you want to start windows normally. Open system configuration window and uncheck safe mode. Let’s get on to the next one.

2.Boot safe mode using shift+Restart technique:

In this technique, we are going to troubleshoot our PC in the Safe mode. This is how we can do it. While you are going to restart the PC make sure you press and hold the shift key in your keyboard and then click on Restart.

  • Once the system restarts it will ask you to select an option. Click on Troubleshoot
Troubleshooot to safe mode
  • Under troubleshoot select Advanced Options
  • Under Advanced Options select Startup Settings
Windows Advanced Options
  • In the Startup settings, you are asked to Restart your PC
  • Once after you restart the Pc you are asked some options click your choice
How to boot safe mode windows 10
  • You can see the options 4,5,6 click on your preferred number in the keyboard
  • Now your PC will boot in safe mode

3. Boot using Shift+F8 keys:

This method won’t work when you are using UEFI mode in Bios. So before we start make sure that you check the boot mode is in Legacy mode. You can check this mode by simply following these steps

  • Type Win + R keys in your keyboard.
  • Then type msinfo32 in the text box
  • Now a system information window will Pop Up. Now go to the System summary section and check for the BIOS MODE.
How to boot safe mode in windows 10

As I said earlier if BIOS Mode is UEFI mode then this technique might not work. If it is Legacy mode then simply press Shift+F8 keys to boot safe mode in windows 10. When the Pc restarts you will be asked to continue boot in safe mode and other choices. Simply click on the choice of your preference and you will be directed to it.

4.Boot using automatic repair mode:

Windows will quickly diagnose when ever you make three failed attempts to boot. So the next time when you try to boot you will be prompted to automatic repair screen. Simply follow these steps

Click on Advanced Options > Troubleshoot > Advanced Options > Startup Settings > Restart.

You will be prompted to choose several safe mode boot options. Select your preferred option. The system will boot into safe mode with your preferred option.

This is how to boot safe mode windows 10. If you got any queries or issues while booting to safe mode feel free to ask me in the comments section below. Thank you.

Filed Under: How to Tagged With: booting safe mode in windows 10, How to boot in safe mode in windows 10, How to boot in safe mode windows 10

How to enter and exit download mode (Odin mode) in the Samsung devices

April 7, 2020 by admin

Hello Guys in this guide I am going to write about how to enter and exit download mode in the Samsung devices. If you are a Samsung user and looking to factory reset your device then there is a chance that you enter into download mode accidentally. This download mode is called as Odin mode. I think most of the people know about this term but for those who don’t know here are a few lines for them.

What is ODIN mode and how to use ODIN mode?

ODIN is a German name which is usually referred to as the king of all Gods in German mythology. The same applies to Samsung technology here. ODIN is a simple program that lets a user flash whatever he wants in the internal memory of the device. All he needs to do is to download flash file might be a custom ROM and use a USB cable along with a PC to flash the file onto the memory. I will publish about the flashing process later. So let’s get to know how to enter into download mode

How to Enter download mode in your Samsung device:

In order to enter download mode in your Samsung device follow this method. In some models, you need to press the VOLUME UP + HOME + POWER BUTTONS at the same time.

You have to press for the next 10 or 15 seconds until the download icon appears on your device screen. Now you are in download mode.

In some advanced models, you need to press both volume buttons and simply plug in the USB cable into the port. The device will automatically enter into the download mode.

Once you enter download mode press VOLUME UP or DOWN keys to continue. You can use software like ODIN and HEIMDALL to flash custom ROM in the internal memory of the phone. Before you start flashing make sure that you uninstall Samsung Kies. Also, there are a lot of Softwares available in the market that can help you enter download mode. Just google you can find them easily. If any of the buttons won’t perform then that software might come handy. You can check software from wondershare

How to Exit download mode in Samsung device:

If you got into download mode either intentionally or accidentally. Some people might have to enter in the recovery mode in order to factory reset. But they accidentally enter download mode. Don’t worry you can come out of download mode by simply pressing the VOLUME UP & DOWN +HOME + POWER buttons at the same time. The device may get blank or reboot normally. In case if your device gets blank press the power button.

Also Read: How to enable cookies on android

This is how you can exit download mode in your Samsung device. I suggest you not use ODIN and flash custom ROM on your mobile. There may be a chance that your phone might brick. It will cost more to repair your phone. So make sure you don’t install custom ROM in your device.

If you still have trouble in entering or exiting download mode then let us know in the comments section below. The next time when your friend asks you how to enter and exit download mode then share this guide with him.

Filed Under: How to Tagged With: How long does odin mode take, How to come out of download mode, How to enter and exit download mode, How to enter into download mode, How to use odin mode

How to enable cookies on android phone

April 4, 2020 by admin

In this guide, we are going to write on how to enable cookies on android phone. You might have read or heard about these cookies whenever you start browsing a website. Most of them know about these cookies but for those who don’t know here is some info about cookies.

Cookie is a small piece of data that is stored in the user’s browser. These cookies will gather the browsing activity, items added in the cart and collect much more information about the user. There are different types of cookies like session cookies , persistent cookies, authentication cookies and third party cookies. They collect information like whether the user logged in or not, his browsing time etc and send them to the web Server. They are very valuable for the site owners.

So without wasting any time let’s know how to enable cookies on android phone.

How to enable cookies on android phone:

Most of the android users have different types of browsers installed. I am going to cover each and every browser that is used on an android phone.

Enable Cookies in Google Chrome app:

Google chrome is the most popular and the most downloaded app all over the world. If you are one among them then follow this step by step guide in order to enable cookies in your google chrome app.

  • Open Google Chrome app in your android phone
  • Click on the three dots ⋮  that are present on the top right of your screen
  • A drop-down menu will appear then click on SETTINGS
  • Scroll down a bit, under advanced settings click on the SITE SETTINGS option
  • Click on COOKIES now turn on the button where it asks allow sites to save and read cookie data. For better understanding, I am sharing a screenshot taken in my mobile here.
  • enable cookies in google chrome app
  • You can also allow or prevent third-party websites from saving and reading cookie data.

This is how users who are using google chrome app in their android device enable cookies. If you are not using this browser you can simply download it from the Google play store

Enable cookies in Mozilla Firefox app:

Mozilla Firefox known for fastness and privacy is also one of the most popular browsers. If you are Mozilla Firefox user then you can simply follow this step by step guide in order to enable cookies

  • Open Mozilla Firefox app and then click on the three dots ⋮ that appear on the top right corner of your screen.
  • A drop-down menu will appear, Click on SETTINGS
  •  Tap on PRIVACY
  • Click on COOKIES, a pop window will open where you can enable cookies.

This how you can enable cookies in your Mozilla Firefox app. There is also one more version of Mozilla Firefox named Mozilla Firefox Lite. It is a lightweight browser made by the developers. The process of enabling cookies might also be the same.

Also Read: How to view browser history in incognito mode

Enable cookies in Opera Mini Browser:

It is also one of the most popular browsers used in android devices. In some basic android devices it comes as the built-in default browser. You can now simply follow this guide to enable cookies in your Opera mini browser.

  • Open your Opera Mini browser and tap on the Opera logo which is present on the bottom right of your screen.
  • A small window will open where you can find the SETTINGS option which is indicated by a gear icon.
  • Click on the ADVANCED option by scrolling down.
  • Now you can see the COOKIES option click it
  • How to enable cookies in Operamini browser
  • By default it is enabled you can disable and re-enable it according to your wish.

Enable Cookies in Samsung and Mi phone Browser:

Samsung and Mi considered one of the best brands all over the world. If you are a Samsung mobile user you can simply enable cookies in the browser by following these steps

  • Click on the Browser
  • Tap on the three dots present on the top right of your screen.
  • Click on SETTINGS
  • Click on PRIVACY & SECURITY
  • Under ACCEPT COOKIES can enable or disable.

This how you can enable or disable cookies in the default browser of a Samsung or Mi mobile. I am writing this guide by checking the basic models. I think the process may remain the same for higher models also.

UC Browser:

Well this Chinese browser is lightening fast but the cookies come auto enabled in this browser. We don’t have any option to enable or disable cookies in it. All we can do is clear the cookies which we can do by simply following this guide.

  • Open UC browser
  • Click on the three horizontal lines which are present on the bottom of your screen
  • A Pop Menu will appear where you need to click on the Gear icon, which is considered as Settings
  • Scroll down a bit and click on the Clear Records option
  • A pop window will appear where you have to select Cookies in order to clear them

This how you can clear cookies in a UC browser. If you need any help in enabling or disabling cookies any of the browsers mentioned above you can simply comment down below. We will reply and help you as early as possible.

Filed Under: How to Tagged With: How to enable cookies on android, how to enable cookies on android Phone

How to type in different languages in windows 10

April 1, 2020 by admin

Hello, guys in this article I am going to write on how to type in different languages in windows 10. This guide may come helpful for those who are looking to type in their preferred language. So without wasting any time let’s get to know about different ways of typing different languages in windows 10.

Online way:

If you are looking to type in a different language inside a particular software like MS word etc you can simply do it by using google input tools. This simple and cool tool helps you type in your preferred language. In order to type, firstly start by typing google input tools in your browser or you can click on the link above. All you need to do is simply select your preferred language and start typing in the box below. This tool will automatically convert to the language of your choice.

How to type in different languages in windows 10

You can see in the image below where I need to type in Arabic. I just select the Arabic language from the drop-down and then started typing in English. Even if you type in English text the tool will convert it to Arabic. You can copy the Arabic text and paste it where ever you want.

How to type in different languages in windows 10

This is the simplest way. All you need is a good internet connection for it.

Offline way, Type in different languages in windows 10:

In order to do it in windows 10, you need to change your keyboard layout to your preferred language. You can do this as follows

  • Click on windows icon and click on settings. You can directly type settings in the search bar and hit enter.
  • Under settings click on Time & Language.
  • Select region & language
  • Under languages option you have to add the language of your preferred choice.
How to type in different languages in windows 10
  • In my case I am going to add Arabic language. You can add any language of your choice. All you need to do is simply select your language.
  • Now you can see your preferred language under language section. That’s it you can now type in the language of your choice.

Once after you add the keyboard you need to change the default keyboard whenever you want to type in another language. You can do it by clicking on the ENG language keyboard and then change it. You can see this option on the bottom right side of your PC screen.

By this way, you can type in almost all the world languages. If you need any help in adding the keyboard do let us know in the comments section below. Thanks in advance Sharing is Caring.

Filed Under: Windows Tagged With: how to type in another language in windows 10, How to type in different languages in windows 10

Some questions, please restart Chromecast issue solved

March 27, 2020 by admin

Recently I faced a weird issue while using my Chromecast. Every time I turn it On a message appears “Some questions, please restart”. If you too facing the same issue then here is a step by step guide for you. When I got this issue I don’t know what to do initially. Later on, I searched for some videos and forums on the web. I got to know about solving some questions please restart Chromecast issue easily.

So without wasting any time let’s get to know about the issue and it’s solution.

Some questions please restart Chromecast fix

When you see this issue in your Chromecast, all you need to do is just restart or reboot your device. You can do it in two ways

One is google home app and the other one is pressing the reset button present on the device. I am going to describe the two ways below. Let’s know how to restart Chromecast using google home app.

How to restart Google Chromecast using Google Home app:

In order to restart Google Chromecast, you need to download the google home app in your android device. After that, you need to connect to the same wifi network that your Chromecast is connected to and then follow these steps.

  • Once you connect to the same wifi network open the google home app
  • Tap the name of your Google Chromecast device
  • At the top right corner of the app screen, press settings
  • Tap more settings under settings there you will find the reboot option. Simply tap and press yes if asked.

That’s it your google Chromecast device will restart after some time. If you don’t have google home app on your mobile you can simply plug out the USB power cable while the device is still plugged in the HDMI Port. Wait for a minute or two and then plug in the USB power cable your device will restart now. There’s one more way to reset your Google Chromecast device.

Reset Google Chromecast using Reset button:

If you closely observe the Chromecast device you can find a small button by which you can reset the device. All you need to do is press and hold the button for 30 seconds while the device is connected to the HDMI port of the Tv. Your Tv screen will go off while the restart process begins.

Some questions please restart Chromecast

Make sure you select the right input source to the Tv. If you connect the device to the HDMI port 1 and you select another port as the input then you can’t check whether the device has rebooted or not. This is how you can restart/reboot the Google Chromecast device. Once after a successful factory reset, you need to set up the device again.

The next time when your best buddy asks about Some questions please restart Chromecast issue. Don’t forget to share this guide with him. Sharing is caring.

Filed Under: Gadgets Tagged With: Google chromecast issue, google chromecast not turning on, please restart chromecast, Some questions, Some questions please restart Chromecast, Some questions please restart Chromecast issue

Amazon fire tv stick remote not working fix

March 21, 2020 by admin

If your amazon fire tv stick remote not working then this guide is for you. Those who own amazon fire tv stick could get problems with their remote as the time goes on. Various issues arise the remote and will lead to its abnormal functionality.

In order to confirm that there is an issue with your remote. Install the fire stick app on your mobile and try operating the device. If it works then you are certain now. There is an issue with your remote and not the device. In case if there is a fault with your device. I had published an article earlier. Try reading it here >> Amazon fire tv stick not turning on <<

Without wasting any time lets get to know about the various factors that may stop the functionality of the remote and their respective solution.

Amazon fire tv stick remote not working solution

  1. If your amazon fire tv stick is not working at all make sure that the batteries have some power left in it. If not try replacing the batteries. Also if you are using the fire tv stick remote for the first time you need to sync the remote with your Tv. Follow the instructions that appear when you connect the fire tv stick for the first time. Else your amazon fire tv stick with Alexa may not work.
  2. Amazon fire tv stick may work in the distance of 12ft apart from that it may not work. Make sure you are in the range.
  3. Avoid placing too many electrical components near the fire tv stick. The electrical waves may create hindrance which may result in the interference and lower the connectivity of the remote with the fire tv stick device. Also, make sure you place that the device is left open in order to give it reception free of problem.
  4. Make sure the device is connected to the power adapter as well as your wifi connection.
  5. Check whether there is any leakage from the batteries that are flowing in the remote. Clean it and replace the damaged batteries.
  6. Check the HDMI port of your Tv is working. Incase if the HDMI port is on the back of your Tv make sure there is some space left behind after you connect the device to the HDMI Port.
  7. Check whether your remote is connected to the device. You can do this as follows

How to check amazon fire tv stick remote connected or not?

You can check if the remote is connected with your fire tv stick by simply following these steps

  • Open Settings in your device
  • Navigate to Controllers and Bluetooth devices
  • Under Amazon fire tv remotes you can check the list of connected devices.
  • Pair your remote again if it is not in the list.

This way you can fix your amazon fire tv stick remote. Also make sure you are using the remote that comes with your device and not your neighbour’s. Some times compatibility issues may arise with the device as the model varies. There is a guide on pairing fire tv stick remote on amazon and you can check it in the link. Still if your amazon fire tv stick remote not working you have to replace it with a new one. If you got any queries or suggestions do let us know in the comments section below. Thank you sharing is caring.

Filed Under: Gadgets Tagged With: amazon fire tv stick issues, Amazon fire tv stick remote not working, fire tv remote not working, firetv stick remote not working

Wifi connected but no internet access in android? Here’s how to fix

March 13, 2020 by admin

Wifi connected but no internet access in android? Today I am going to write on this interesting topic. Most of the android users are experiencing this weird issue. Even if you are connected to the wifi you won’t be able to access the internet on your android mobile.

I know it will be frustrating when you can’t access the internet and send those early morning wishes or late-night goodbyes on social media platforms. So without wasting any let’s know how to solve this issue.

Fix Wifi Connected but no internet access issue in android:

Before we start, make sure your wifi router is ON and type in the exact password in your mobile. If you are not able to access the internet even though you are connected to wifi. Forget the network and restart your mobile. Then try reconnecting to the same network by entering the correct password. Still, you can’t access the internet even after connecting to the wifi network. You can try resetting the network settings. This is how you can do

Reset Network Settings

If you made changes unknowingly in your network settings you can reset them to factory mode. This may solve any issues with your wireless/Bluetooth connection. You can do it by simply following these steps

  • Click on the settings icon
  • Under network and internet tap on the three dots present on the top right of your screen
  • Click on the Network Settings reset and then click on Reset settings

In some models like Xiaomi, you can find this option in the More option below Sim and network settings. In other models, you can also find this option in Backup and Reset.

Also read about: iPhone 7 no service issue

Resetting network settings will also solve any issues with your cellular network as well. Still, if you can’t access the internet even after resetting the network settings then try changing the static IP and DNS in your mobile.

Try Changing Static IP and DNS to access the internet

If you can’t still access the internet try changing the static IP and DNS of your wifi connection. You can do this by simply following these steps

Wifi connected but no internet access in android
Image credits the www.Thewindowsclub.com
  • Connect to the wifi network and make sure you enter the exact password
  • Now long-press the name of your wifi network a window will pop up
  • You will find Manage Network Settings option, click on it
  • Tap on Show Advanced Settings in some mobiles you can see as modify network
  • Under IP settings select Static option instead of DHCP
  • Under the IP address change only the last number you can input any number between 1-255. Let’s Suppose if your IP address is 192.168.35.115. You can change 115 to any number between 1-255 of your choice
  • Now change DNS 1 option to 8.8.8.8 and DNS 2 option to 8.8.4.4

This way you can change the static IP address and access internet connection. By this time you can browse the internet in your android device. If you still cannot access the internet even if you are connected to wifi then there may be a hardware issue. You need to check network antenna in your mobile. If you can fix on your you can proceed else visit the nearest service centre and get it fixed.

Filed Under: Android Tagged With: Wifi connected but no internet access, Wifi connected but no internet access in android, Wifi connected but no internet in android

  • « Previous Page
  • 1
  • 2
  • 3
  • 4
  • 5
  • 6
  • Next Page »

Join GUIDEMETECH.COM now

Be the first to get every post to your inbox. Never miss an update from us

Softwares

Best Video Editor App for PC | CyberLink Power director free Download

In this … [Read More...]

Best PDF editor for windows 10 |Ashampoo Pdf Pro 2 Download

If you are … [Read More...]

More Posts from this Category

Recent Posts

  • Fire Stick not working? Here’s what you can do
  • Turn off this call is being recorded Announcement on Android
  • How to record incoming call on iPhone without app
  • Something went wrong please try again later Instagram error solution
  • Do your mouse automatically double clicks? Here’s a fix

Categories

  • Android (4)
  • Gadgets (8)
  • How to (38)
  • IOS (5)
  • Mac OS (2)
  • Softwares (2)
  • Windows (2)

Copyright © 2025 · News Pro Theme on Genesis Framework · WordPress · Log in