• About Us
  • Contact Us
  • Disclaimer
  • Privacy Policy
  • Terms and conditions

Guide Me Tech

Your guide in every aspect of Technology

  • Home
  • How to
  • Android
  • IOS
  • Mac OS
  • Windows
  • Gadgets
  • Softwares

How to extract Zip or RAR files in google drive exactly

August 25, 2020 by admin

Looking to extract zip or RAR files in google drive and don’t know how to do then you are on the right page. In this guide, I am going to show you how to extract zip/RAR files in google drive. Today one of my friends sent me a large file on google drive.

When I tried to check the contents of the file it was not opening in google drive. He sent me a RAR file. When I tried extracting the files I was not able to do so. After going through the google community forum I got to know that we can’t extract compressed files inside google drive.

You have to download the files in your PC and then extract the files. In case if you want to archive a folder you have to do it on your PC then upload it to your Google drive. Without the need to do anything on PC, I am going to show you the method by which you can compress and extract files in google drive.

Extract zip or RAR files in google drive using ZIP Extractor App

Let’s start with the zip files. If you want to extract a Zip or Rar folder inside google drive then simply follow these steps.

  • Open your Google Drive account
  • Click on the New option on the top left corner of your screen.
  • Click on More and then click on Connect more apps.
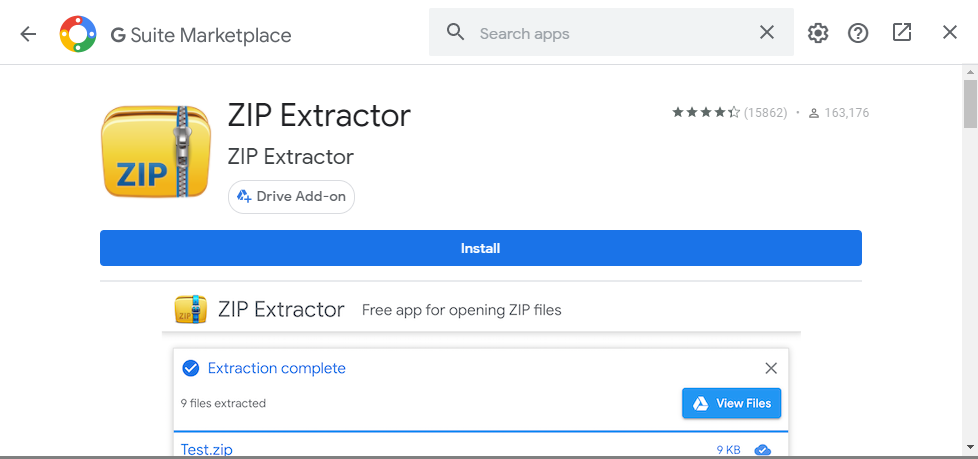
  • A google market place window will open where you need to search for the app called Zip extractor.
How to extract Zip or RAR files in google drive exactly
  • Click on the install button and then connect it with your Google account.
  • Once after the successful connection, you can use the app to extract the Zip or Rar files.
  • In case if the app asks for any permissions simply grant them.

If you are using google drive on mobile and not able to install the app. You can get this app by switching to the web version in your mobile. Switching to the web version will allow you to install the app.

Extract using online portals

Many online portals will help you extract the Zip or RAR files in your Google Drive Cloud Platform. One such portal is Cloudconvert.com. Here is the step by step guide by which you can compress or extract zip files in your Google drive.

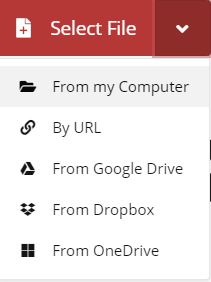
  • Go to cloud convert and click on the drop-down arrow on the right of select files
How to extract Zip or RAR files in google drive

  • Enter your google drive credentials, Select your Zip/RAR file and upload it to the platform
  • Once after successful upload, the file will be processed and you will get options regarding what to do with the file under the select options.
  • Now under the select option, you need to choose the extract
  • Don’t forget to check the box that says save the file to my google drive. Checking this option will extract the file in your Google drive.

That’s it. This is how to extract Zip or RAR files in Google drive. I hope after reading this guide you can now extract compressed files in your Google drive. In case if you find any other way by which you can extract files inside Google drive folder do let our readers know by posting in the comments section.

Also, read: how to know who unfollowed me on Instagram

You can also post a comment if you find any difficulty or not able to extract the files. I will get back to you as soon as possible. Do like and share this guide with your friends and don’t forget to subscribe to our newsletter. Thank you.
Filed Under: How to Tagged With: extract Zip or RAR files in google drive, How to extract rar files in google drive, How to extract Zip or RAR files in google drive exactly, Zip files in google drive

How to know who unfollowed me on Instagram

August 14, 2020 by admin

Right now if you are searching for how to know who unfollowed me on Instagram then you just landed on the right page. With over 1 billion users, Instagram tops the category of photo and video sharing platforms. We can not only create a personal profile but also a business account for a brand on Instagram. With the business account, users can get a lot of information regarding your products and services.

If you suddenly feel like your follower’s list is declining and want to keep track who unfollowed you then this guide will come handy for you. So without wasting any time let’s get into the topic.

The manual way to know who unfollowed you on Instagram

In most of the social media sites when a user unfollows or unfriend we will get a piece of information in the form notification. But in the case of Instagram, there is nothing like that. We have to figure out by visiting the profile of each and every follower we remember who was following earlier. Here’s how you can do it.

  • Open the Instagram profile of the user in your app
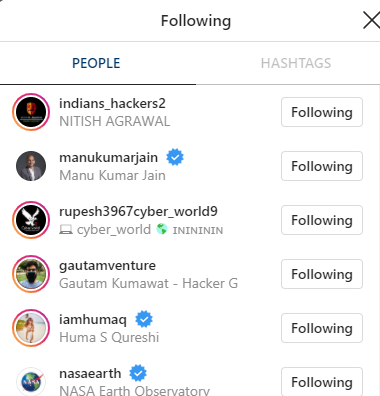
  • Go to the tab that says Following like the picture below
how to know who unfollowed me on Instagram
  • Scroll down and find your name in the list of following
  • If your name is not on the list, it means that the person has unfollowed you.

Remembering your followers and going through their profile is not an easy task. This method will be helpful for those who got less number of followers. In case if you got huge follower’s count then it will easily take a day or two to figure out who unfollowed you by this method. Keeping track of your followers will be a hectic task when you got a huge following. Here is where third-party apps come to our rescue.

Using Third-Party apps to check the Instagram unfollowers

There are a lot of third-party apps that will help you keep track of your followers. Here I am going to mention some of them that will help you track the list of unfollowers for sure.

Follower Analyzer for Instagram:

The first app that comes in the list for tracking the followers is Follower Analyzer for Instagram. With this cool app, you can keep track of your followers. Let’s get to know about the features of this app.

  • I can say that this app is the solution for your query “How to know if someone unfollows you on Instagram?”. You can check who unfollowed you recently and not following you back on Instagram.
  • You can also know about your followers who did not like or comment on a single post.
  • Tells you the post which got the most number of likes and comments.
  • You can also view people who are often tagged in your posts
  • Analyze not only your account but also your friend’s account whom you follow. You can check his most commented posts, top liker, top commentator and much more.

If you are looking to try this app you can get it from the google play store. Click on the link to download Follower Analyzer for Instagram.  It also contains additional features that can be purchased to unlock the true potential of the app. If you are an iPhone user you can get this app from the AppStore.

Check who unfollowed you using – Ana.ly

The next app that comes in our list is Ana.ly. With over 1 million installs on play store. You can get it from the google play store from the following link Download Ana.ly. Following are some of the features that you can get after installing this app on your phone

  • Track the list of unfollowed persons as well as new followers
  • Also, you can check the list of the person who blocked you on Instagram
  • Get the list of the persons whom you follow but they won’t follow you back.
  • Know the viewers of your story
  • Apart from these, you can also get the most and least liked/commented posts.
  • You can also get the list of your admirers, the persons who comment your posts without following you
  • There are lot more features all you need to do is just simply download the app and try to explore the features.

With the help of this app, there is no need for you to go to a search engine and check how to know who unfollowed me on Instagram. This app also contains in-app purchases. If you need more features you purchase accordingly.

Check who Unfollowed you using “Unfollowers 4 Instagram”

This cool app will give you a list of the people who stopped following you recently. It will also analyze and let you know whom you follow and who’s not following you back. The best thing about this app is its user interface you can download unfollowers 4 Instagram from the google play store. This app will resolve the query “how to find out who unfollowed me on Instagram” in your mind.

Try Followers & Unfollowers app

Also, check with the followers and Unfollowers app from the play store. This app will let you know your recent unfollowers. It will also give the list of mutual followers and add a star to mark any person as a favourite follower. This app is helpful for those who would like to mass unfollow Instagram followers. This app also contains ads and offers in-app purchases.

There are a lot more apps that promise to give the list of your Instagram profile unfollowers. You can search them on google play store for android users as well as the app store for the iOS users. I just wrote on a few apps I know if you come across any such app that has helped you find your Instagram unfollowers do share it in the comments section below with our readers. Do check my earlier guide on How to change default browser in Redmi mobiles

I hope your query “how to know who unfollowed me on Instagram.” got resolved now. If you got any issues, suggestions do let me know in the comments section below. I will get back to you as soon as possible. Also, don’t forget to subscribe to our newsletter and be the first to read our articles. Thank you sharing is caring.

Filed Under: How to Tagged With: how to know who unfollowed me on Instagram., list of instagram unfollowers, who unfollowed me on instagram

How to change default browser in redmi mobiles

August 3, 2020 by admin

Looking to change the default browser in your mi mobile? then you are on the right page. In this guide, I am going to write on how to change default browser in redmi mobiles. Most of the people are familiar with different browsers like Google Chrome, Mozilla, UC browser, Opera mini and much more. It may be one of the reasons to switch the default browser in their redmi mobile.

I got redmi note 5 with me and recently I made google chrome my default browser as it is fast, familiar and easy to use. Without wasting any time let’s get to know how to change default browser in redmi mobile

Change default browser in Mi Mobiles

If you are looking to change the default browser and don’t know how to do then simply follow this guide.

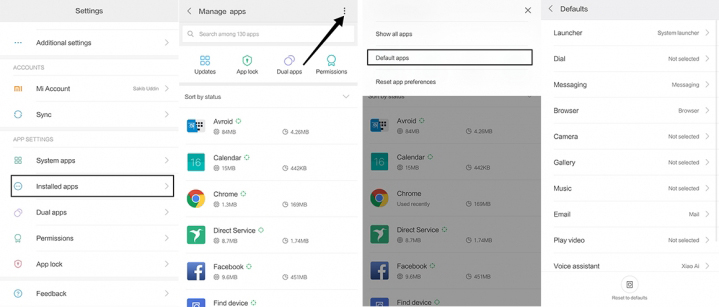
  • Open the settings and Tap on Apps
  • Tap on Manage apps
  • Under manage apps screen tap on the three dots menu present on the top right corner of your screen
  • You will find the default apps option. Tap on it.
  • Under default apps, click on the browser
  • You will find the installed browsers on your mobile. Tap on the browser you prefer to be the default.
How to change default browser in redmi mobiles

That’s it now whenever you click on any URL it will open in your default browser. I prefer google chrome and made it the default browser in my redmi note 5 mobile. So whenever I click on each and every URL it will open in the google chrome browser by default. Also, read our previous guide on The user profile service failed the logon. This guide comes handy for those who are facing errors while logging to their windows PC.

Hope you may have changed the default browser in your mobile too. In case if you got any queries on how to change default browser in redmi mobile. Feel free to ask me in the comments below. I will try to reply to them as soon as possible. Do share and subscribe on my blog. Never miss an update. Thank you.

Filed Under: How to Tagged With: How to change default browser in mi mobiles, How to change default browser in redmi, How to change default browser in redmi mobiles, How to change default browser in xiaomi mobiles, How to make google chrome default browser in mi mobiles

The User Profile Service failed the logon error in windows solved

July 26, 2020 by admin

Hello guys, it’s been a while since I made a post on my blog. Today I am going to write on a fix for an error in windows. In this guide, we will get to know how to fix the user profile service failed the logon error in windows. This guide will be most useful for Windows users. I thought of writing on this topic because recently one of my friends was not able to login to his laptop. He gets this error message constantly no matter how many times he tries.

Nothing can be more annoying than your Pc declining to login to your user profile. Without wasting any time let’s get to know about the reason for this issue and its fix.

Cause for the User Profile Service failed the logon error

Mostly corrupt windows registry is the cause for this error. In case if you are also facing this issue then here is a step by step guide on how to fix the User Profile Service failed the logon error

Fix user profile cannot be loaded issue

In order to fix the User Profile Service service failed the logon, the user cannot be loaded error. First of all, make sure that you are able to boot into safe mode. If you are a windows 7 user You can do it by simply pressing the f8 key while your PC reboots.

You can now see the advanced boot options window where you need to select the safe mode. In case if you are using Windows 8 or 10 then you can boot into safe mode by simply following this guide How to boot safe mode windows which we have published earlier in our blog. Once you are able to boot in safe mode follow these steps

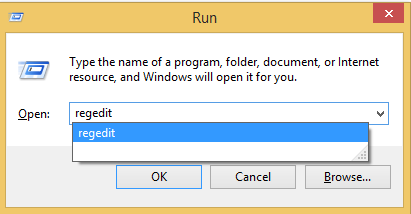
  • Open Run command pressing the Windows + R keys at the same time
User Profile Service failed the logon
  • Now type Regedit
  • This will open a windows registry editor.
  • Now simply go down to the following location HKEY_LOCAL_MACHINE/SOFTWARE/Microsoft/Windows NT /CurrentVersion/ProfileList.
  • You will find two similar profile keys. The key with the extension .Bak is your current profile. The other one will be a temporary profile.
  • In case if you find similar keys then simply click on anyone and check for the Profile image path on the right side window of your screen. You can quickly know which is a temporary profile and which is your user profile. A temporary profile will be like this C:\Users\TEMP
  • Now once you got an idea of your profile simply rename it by adding one or two characters in the profile key name.
  • Select your current Profile key and change its state to 0. You can do this simply double-clicking on the state option and change its value data to 0
  • In the same way, you need to set value data of RefCount to 0.
  • Once you are done you can now restart your PC

Hurray! you will be able to login to your PC now.

In case if you are still not been able to login to your PC make sure you edit the state and Ref Count values of the current profile key and not the temporary profile key. If you find any issue while trying to fix the user Profile Service failed the logon error you can simply let us know in the comments section below. Thank you sharing is caring.

Filed Under: How to, Windows Tagged With: the User Profile Service failed the logon, User profile cannot be loaded, User Profile Service failed the logon windows, User Profile Service failed the logon windows 10

Looking for the best lens for iPhone? Buy from Olloclip

July 10, 2020 by admin

Looking for the best lens for iPhone? then this guide is for you. No matter whether you are an amateur or professional photographer everyone wants to click awesome photos. We know that a camera has its own hardware and software limitations. Whatever photos we take, we do it under these limitations. Beyond that, we can’t capture clean images.

Even if you try you will get distorted or blurry images. Let us suppose you can take a photo of a person within 20 meters range. But when you try to take another photo when he is 100 meters away, you will get a blurred or small image of him. The clarity of both the images will not be the same when you compare. Here’s where iPhone Camera lenses will come handy. They will help you get past your camera limitations and take some awesome snaps.

In this guide, I am going to write on the different types of iPhone lenses from Olloclip. This world-class mobile lens company has got over 100 patents on its name since 2011. It has been one of the most awarded company for mobile lenses. Olloclip continues to innovate awesome lenses for iPhone photography lovers with its top-notch technology and design.

Lenses from Olloclip

Here are some of the lenses from Olloclip that will enhance your Camera view. If you are a mobile photographer then you can buy the following iPhone camera essentials from Olloclip

1.Wide angle lens for iPhone

By placing this lens on your mobile camera you can cover a wide area of the scene which is not possible to cover by your iPhone camera. If you are taking a group photo then this lens will come handy for you. With the help of this wide-angle lens for iPhone, you can get clean photos of wide-area without any distortions.

2. Macro lenses for iPhone

Usually, our camera can zoom to some extent beyond that the image will get blurry. With the help of this macro lens for iPhone, you can zoom 15x and take the closest possible shot. In short, we can also call them as zoom lens for iPhone which can give sharp and high details of a small object.

You can buy Wide angle lens along with Macro lens as a combo from the link below

Buy Wide-Angle and Macro Lenses Today

3. Fish Eye lens for iPhone

This lens will capture images like a fish eye. With 180 degree view it offers spherical view of the photos. Fun loving creative photographers often use this lens.

4. Telescopic lens for iPhone

Also Read on: Best Video Editor for PC

Telescopic lens for iPhone will help you take photos of an object from a moderate distance. When placed on a camera you can get up to 4x closer to your subject without using digital zoom.

Now you may have bought the lenses next you need to buy the clip.

How to attach the lens to your iPhone camera

Well if you are looking to attach these lenses to your iPhone camera. You need to buy a clip which handles the lens while you attach the clip to your mobile camera.

lens for iPhone
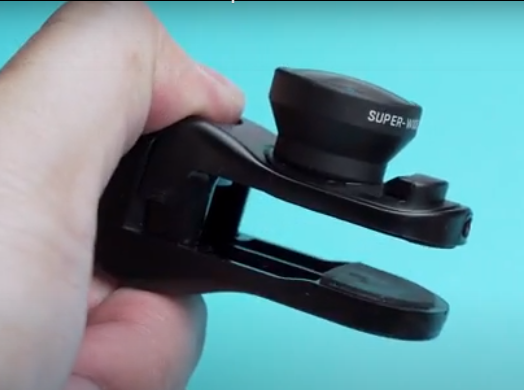
Lens clip for iPhone with lens installed on top of clip

Installing the lens is easy. Just place the lens on the large top cut out then locate the cut inside of the clip.

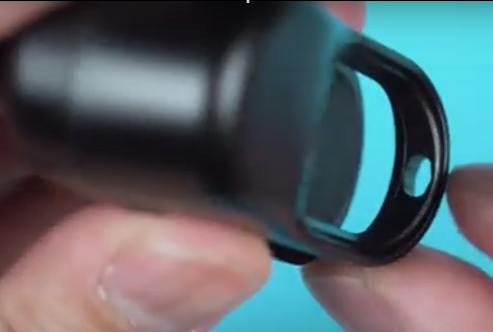
iPhone lens holder

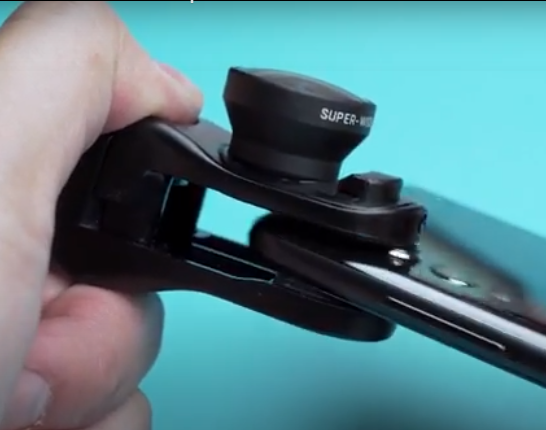
There is a lock on the lens at the end. Just place press the lock inside while you place the lens inside the clip and then release it. The lens will fit into the clip. Now attach the clip onto the phone camera by pressing the button on the backside of the clip.

lens for iPhone Camera

This is how we can attach the lens to the phone camera. In Olloclip 3-in 1 lens kit you will get this clip. Else you need to buy it separately.

The lens and clip vary for iPhone models choose your model before you buy. For more information regarding the lens you can visit below link.

Find the Perfect lens for Your iPhone

If you got any queries or suggestions do let us know in the comment section below. Thank you sharing is caring.

Filed Under: Gadgets Tagged With: lens for iPhone, Macro lenses for iPhone, Wide angle lenses for iPhone, zoom lenses for iPhone

Best Video Editor App for PC | CyberLink Power director free Download

July 3, 2020 by admin

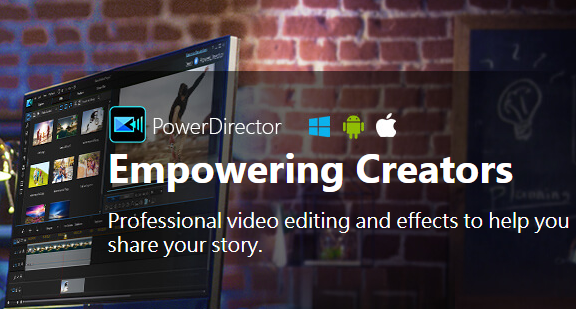
In this article, I am going to write on the best video editor app for PC. Most of you may shoot awesome videos with family, friends and colleagues. Some of you might save them as memories and some would like to upload on different social media platforms. If you are a YouTuber or social media influencer then you will upload videos on your channel for sure. You may be looking for video editing software to make the videos look professional. CyberLink Power director is the best choice.

Why CyberLink Power Director is the Best Video Editor App for PC?

Whether you are a beginner or an experienced video editor you will love to use Cyberlink Power director because of its features. Without wasting any time lets get to know about the feature of Cyberlink.

Best Video Editor App for PC

Cyberlink features

Built-in Templates

In case if you are a beginner don’t worry there are built-in templates under express projects especially made for you. All you need to do is drag and drop the video onto the timeline. Select your favourite template and click produce. Effects, music, transitions everything will be added to your video automatically. You don’t need to perform anything. Just sit and relax.

Add stylish Titles

You can easily add ready to use stylish titles with motion graphic elements. All you need to do is just drag and drop a text to your Instagram and YouTube projects.

Add Customized shape objects:

With the shape designer tool, you can add customized shape objects with auto-fit text and keyframe controls. You can choose a wide range of text bubble and call outs in the shape designer. You can also add a stylish mask to your titles and reveal them.

Creative effects for the Pros

Well if you are a pro there are some cool effects that you can apply. Effects like multi-key colour sampling where you can apply Hollywood like green screen editing. Apply various creative transition effects and produce stunning videos. With advanced motion tracking, you can track video clips frame by frame with 100% accuracy.

Speed Effects & One-click enhancement

If you are an action camera or drone user then the action camera centre gives everything you need to quickly edit, correct and enhance your footage. Here are some of the following effects that you can use

  • Slow motion and Fast motion effect
  • Reverse, Repeat and Replay
  • Stop motion, Freeze Frame, zoom and Pan
  • Correct fish eye and color distortions
  • Stabilize shaky footage

CPU & GPU Performance Boost

Enjoy the better performance with 8+core processors with improved multi-threading. This best video editing software for PC also supports transcoding of non-full frame video clips in a single timeline track.

Format & Camera Support

Renowned for being the world’s fastest, most comprehensive video editing software, which supports the latest video, photo and audio formats in up to 4k resolution. You can also import and edit video shot on professional-grade camera in HEVC & VP9 10bit HDR10 & HLG, ProRes 10bit 4:2:2, XAVC 8bit 4:2:0 and MXF AVC 8bit 4:2:0 video compatibility.

Best choice for you Tubers, Vloggers and Instagrammers

With the following features, we can say that this is the best video editing software for Windows PC users.

  • Nested Projects as PiP
  • Audio scribbing
  • Align objects in a snap
  • Video Pre-Cut
  • Reversible Timeline Track
  • 4k Preview

There are also some premium plugin and effects that you would like to buy. This about the features now let’s come to the system specifications

Cyberlink Power director software System Specifications:

1.Operating SystemMicrosoft Windows 10, 8/8.1, 7 (64 bit OS only)
2.ProcessorIntel Core™ i-series or AMD Phenom® II and above
3.Graphics ProcessorStandard Video: 128 MB VGA VRAM or higher
360-video: DirectX 11 compatible
AI Plugin: 2GB VGA VRAM or higher
4.Memory4Gb required ( recommended 6Gb or Above)
5.DVD burner deviceRequired for DVD burning
6.Sound CardWindows-compatible sound card required
7.Internet ConnectionRequired for Initial Software installation, activation and registration. Necessary for downloading patches and director zone services
8.Screen Resolution1024 x 768, 16-bit colour or above
9.Language Support
English
French
German
Italian
Spanish (European)
Chinese Simplified
Chinese Traditional
Japanese
Korean
Dutch
10Formats You can import and export an audio & Video in almost all used formats in the modern-day world. In case of images except for the WebP and WebM, you can import or export any type of image format.

Best Video Editor App for PC|Cyberlink Power Director Software pricing

If you are looking to the purchase this Best Video Editor App for PC in order to edit your video projects then here is its pricing. The pricing differs for the New user and Upgraded user. You can also purchase the software on a lifetime as well as subscription basis.

Download Cyber Link Power Director

You can also download this software for free with limited features on a trial basis. Download this software from the link above. In case if you want to purchase the full version of this software then here is the pricing.

New user Lifetime License Pricing

Power Director  18 Ultra$99.99
Buy Now
PowerDirector 18 Ultimate$129.99Buy Now
Price at the time of publishing this article

New user Subscription based Pricing

Power Director 365

Actual Cost $69.99 with (25% OFF) costs $51.99 annually.
It will cost $4.33/ mo.
Buy Now
Director Suite 365
Actual Cost $129.99 with (25% OFF) costs $96.99 annually.
It will cost $8.08/ mo.
Buy Now
Price at the time of publishing this article

Upgrade User Pricing details

Power Director 18 Ultimate 9 (Lifetime License)$84.99
Buy Now
PowerDirector 365 (Subscription basis)Actual Cost $69.99 with (25% OFF) costs $51.99 annually.
It will cost $4.33/ mo.
Buy Now
Director Suite 365 (subscription basis)
Actual Cost $129.99 with (25% OFF) costs $96.99 annually.
It will cost $8.08/ mo.
Buy Now
Price at the time of publishing this article

Also Read on : Facebook Avatar

When it comes to the support you just need to shoot an email to the support centre with your queries. There is also a learning centre, Community Forum and member zone where you can ask and learn from the experts. This is all about the Cyber link power director which is the Best Video Editor App for PC. In case if you got any queries or suggestion do let us know in the comments section below. Thank you sharing is caring.

Filed Under: Softwares Tagged With: Best video editing software for free, Best video editing software for youtube videos, Best Video Editor App for PC

3 ways to create your own Facebook Avatar

July 1, 2020 by admin

Hello guys, in this guide I am going to write on how to create Facebook Avatar. Initially, this feature was introduced for the users in Australia, Europe, Canada and New Zealand last year. Now, Facebook introduces a profile avatar feature for users residing in the United States and other countries. Slowly they will roll out this feature to the users across the globe.

Facebook avatar is nothing but a virtual look-alike character that can be used in comments, stories and messenger chats. If you are a Facebook user and like to create your own avatar then you can do it in three ways.

1.Create Customizable Facebook Avatar using the Fb App

If you are looking to create a Facebook Avatar then simply follow these steps

  • Open Facebook App on your mobile and login to your account
  • Click on the three horizontal lines present on the top right corner of your screen
  • Tap on the see more and select Avatar Option as shown in this image below
  • Select your Skin Tone and then click on Next
  • Now an Editor will appear on your screen where you can select hairstyle, Face Shape, Complexion, Face lines, Eye shape and Colour, Nose, Makeup, Eyebrows, Body shape, Headwear, Earrings and much more of your choice
  • Once you are done with the selection you can preview the avatar on your screen
  • You can share it on your Facebook, Instagram and also make it as a profile pic.

This is one way to create your Facebook profile avatar and let’s move on to the next one.

2. Try from your Friend’s profile

If you find the first way a bit difficult then you can do it in a simpler way in the second. All you need to do it search for a friend’s profile who has recently uploaded Facebook avatar as a profile pic. There should be a button on the lower right-hand corner saying Try It. Tap on it and a Facebook Avatar Editor will appear on your screen and then create your own Avatar.

This is how to make an avatar on Facebook using your friend’s profile. This is the easiest way you can create an avatar.

Trying to make one and have been Unsuccessful? you are not alone!

A lot of people are asking for help as they are not able to create their own avatar. Here are some tips that may help you create your Facebook avatar.

  • Most of the users complain that they can’t see the Avatar option under the Facebook settings. For all those users make sure you have updated Facebook app on your mobile. Unless you won’t see the option. Updating will solve.
  • The next thing is to turn on location. Some users say that when they turn on the location they are able to make the avatars.

Still, if you are not been able to create your own avatar then do it the following way by using third party apps

3. Try using third-party apps to create a Facebook avatar

If you are not been able to create your own avatar then try it this way. It will be helpful to the users residing in other countries where Facebook hasn’t rolled out this feature yet. Facebook avatar is nothing but a cartoon-like character of your own. You can also do it with the help of third-party apps.

Also Read: Best PDF editor for windows 10

There are a lot of third-party apps online that can make your avatar. All you need to do is simply upload your picture on their portal. These apps will create your avatar. There are a lot of apps present in the market. Some apps will do it for free and some will charge. One such app is Photo Frame which you can find it on play store. This app will create your own cartoon-like picture for free up to 10 times. After that, they will charge you some bucks.

This is how you can create your Fb avatar. If you find any other working way by which you are able to make your own avatar do share it with our users in the comments section below. You can also post your queries and suggestions in the comments section below we will get back to you as soon as possible. Thank you sharing is caring.

Filed Under: How to Tagged With: Fb avatar, how to create facebook avatar, how to create my fb avatar, not able to get facebook avatar

Best PDF editor for windows 10 |Ashampoo Pdf Pro 2 Download

June 26, 2020 by admin

If you are looking for the best pdf editor for windows 10 and don’t know which one to choose then this guide is for you. In this guide, I am going to write on Ashampoo PDF pro which is the best pdf tool for windows 10. There are a lot of Pdf editors in the market that promise to edit but fails to deliver according to your need. But Ashampoo PDF pro is different from others.

What makes Ashampoo PDF pro the best pdf software for windows 10 is its features and pricing. Ashampoo PDF Pro not only create, edit and convert but also compares and protect your PDF files. So without wasting any time let’s jump onto the features

Awesome features make it best pdf software for windows 10

ashampoo software

Before we start, let’s get to know about the company. Ashampoo is a 21-year-old German-based software company that develops software. With over 20 million customers using multiple products Ashampoo is one of the most trusted software company across the globe. PDF Pro 2 is one of their products and following are some of the features of it

Create PDF

With Ashampoo PDF Pro, you can create, modify user engaging pdf files with ease. The built-in spell checker and marker tools help you avoid typos and highlight passages. You can not only create an excellent PDF but also add interactive forms with selection lists, checkboxes to it. User can use any standard PDF reader in order to fill those forms.

Convert and rearrange pages

You can not only convert a PDF file to a different format like Word, HTML or any other file format of your choice but also rearrange pages, crop and rotate according to your fit.

Compare and Extract

Now you can compare two PDF files side by side with Ashampoo PDF Pro. This is useful for those who translate documents or compare the revisions of the same document side by side. Even the smallest of the changes will be revealed by a single click.

With this tool, you can also extract images, edit and insert inside those images into the PDF file

Find, Replace and recognize text automatically

Best PDF editor for windows 10

With Ashampoo PDF Pro, you can find and replace text in PDF. Apart from that, it can also recognize text automatically with the help of a powerful OCR engine that recognizes and convert images of text.

Protect your files

You can add watermark to your PDF and encrypt as well with strong 128 bit AES Encryption in order to prevent others from opening, editing and printing them.

Also read: How to enable autofill iPhone feature

Thinking about the price?

With all these features you might be thinking that the price will be high for this pdf editor. No, this PDF editor cost you just $31. Whereas its alternatives cost in hundreds of dollars. You can buy it here from the following links below

Get Ashampoo PDF Pro 2 for just $31 now

This is the Best PDF editor for windows 10 in just $30. Usually, it costs $60 but if you purchase now you will get it for half the price and you can use up to three users. Test before you buy. You can also download Ashampoo PDF Pro 2 for free.

You can have a trial version of this best pdf reader and editor for windows 10. Regarding the support, you don’t need to worry. They provide awesome support all you need to do is just contact them by mail or simply fill up the contact form there. If you got any queries regarding the software do let me know in the comments section below. Thank you sharing is caring

Filed Under: Softwares Tagged With: Ashampoo Pdf Pro 2 Download, Ashampoo Pdf Pro free Download, Best pdf editor free download

How to enable and update autofill iPhone feature

June 22, 2020 by admin

Hello Guys, in this guide I am going to write on how to enable and update autofill iPhone feature. In case of a purchase, business transactions and paying bills we have to repeatedly fill all the details. This interesting feature helps you autofill fields with your personal information, credit cards, email IDs and passwords. It will not only save your time but also helps in a hassle-free transaction.

Without wasting any time lets get to know how to enable autofill feature in the iPhone.

Enable autofill feature on iPhone

Autofill feature works in Safari and it will automatically fill cells with your personal information. All you need to do is simply enable this feature by following this step by step guide

  • Open Settings app in your iPhone
  • Tap safari and proceed on to Safari Settings
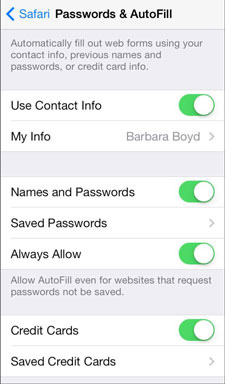
  • Select Autofill option
  • Under Autofill option turn ON the Contact info and select My Info
  • Your Contact info will be enabled for autofill now
  • In case if you want to edit your contact information you can simply open contacts, Tap My card and edit your information.

Now your contact info is enabled for autofill. In case if you want to autofill your credit card details, Email iD’s and Passwords then simply follow this procedure

Autofill Credit Cards, email ID’s and Passwords this way

Simply follow the respective procedure if you want to add an autofill credit card, email Id’s and password details

Credit Cards

  • Open Settings app in your iPhone
  • Tap Safari and proceed on to Safari settings
  • Click the Autofill option and toggle switch ON Credit Cards option
  • Tap saved credit cards and if prompted to enter your Face or Touch ID kindly enter it.
  • Now under Add credit card you can either take a picture of your card with the help of your device Camera or add the details manually
  • Now your card is saved and enable for autofill
  • You can add, delete or edit cards simply by going to the Saved Cards Option

This is how you can add a credit card to the autofill feature in iPhone.

email IDs and Password

Before you start make sure that iCloud Keychain option is ON. In case if you don’t know how to turn this option ON you can ask Siri to turn it ON for you else do it manually by following these steps.

  • Open the Settings app and select Apple ID banner on the top right corner of your screen
  • Tap iCloud scroll down a bit and Turn ON the apple iCloud Keychain option ON
  • Enter your Apple credentials if asked.

Also Read: How to how to decrypt files encrypted by ransomware

We have enabled iCloud Keychain option now we will proceed to autofill our email ID and Password.

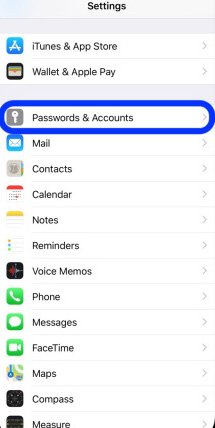
  • Open Settings and select Password and Accounts
  • Tap Autofill and Turn On the toggle switch
  • Now you have enabled your email IDs and password for autofill

This is how to enable and update autofill iPhone feature. This cool feature will help you save time in filling the forms. In case if you got any queries or suggestions feel free to ask us in the comment section below. Sharing is caring.

Filed Under: How to Tagged With: apple iphone autofill feature, autofill feature in iphone, autofill iphone, Iphone autofill feature

What is HETS file and how to decrypt files encrypted by ransomware

June 16, 2020 by admin

Hello guys, in this post I am going to write on What is HETS file and how to decrypt files encrypted by ransomware. Most of you know about different types of files but only some of you might know about HETS file. If you don’t know about the HETS File system then here are a few lines for you. HETS file system is nothing but a malware belonging to the DJVU/STOP family. Cyber attackers mostly try to inject this software inside the PC of a user and then demand Ransom.

For those who know about the HETS file type, they might be a victim of a cyber attack in the past. In case if you become a victim of such an attack then follow this simple guide to get back your files.

What is HETS File

HETS file is nothing but a malware that is used to encrypt files present on your PC. If you got a file by name 1.jpg after the encryption it will be 1.jpg.Hets. Now you won’t be able to look open the file and make any edits to it. In case if you got any information present in that file you are not able to retrieve it any more. The attacker will demand ransom in order to decrypt those files. So don’t worry instead of paying the ransom you can try removing this virus from your PC yourself.

Basically there are two ways to remove the virus from your PC. One is to manually find the infected files and removing them and the other one is using a software. With out wasting any time let’s walk through the process.

Manual Process on how to decrypt files encrypted by ransomware

First of all we will try to find out the infected files and remove them manually. Simply follow this process

  • Press Windows + R keys in your Keyboard simultaneously. A Run window will open
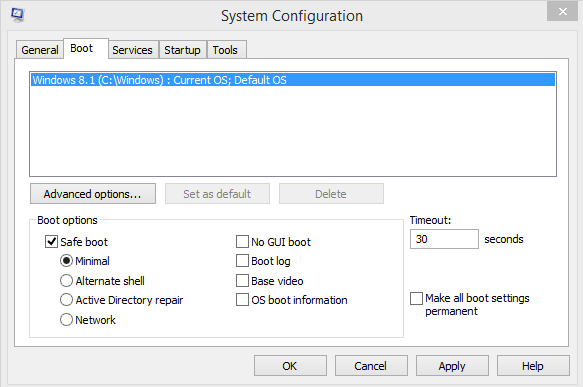
  • Now type MS Config and click OK.
System Configuration window
  • In the system configuration window select the Boot Tab and choose safe boot. Click on Apply and then OK
  • Now you are asked to restart your PC. Do it. Check for the safe mode on the top right corner once after the restart. This to check whether your PC boots in the safe mode or not. Else follow this guide on how to boot safe mode windows 10
  • Take a backup of all the files even though they are encrypted in USB Stick or a Hard drive.
  • Also, search for the hidden files and take a backup of them too
  • To look for the hidden files. Click on window search > Type Show hidden files and folder and then open it.
  • Under file explorer option change the option from Don’t show to show and then click apply. Now you can see all the hidden files.
  • Now click on THIS PC and type the “Fileextension:exe:The Virus” in the search bar.
  • Delete the virus file if find any when you click on the search.

Now it’s time to repair the Windows Registry

Before we start repairing the windows registry make sure you take a backup first. In case we any mess, we can restore it back. If you don’t know how to take a backup of registry then simply follow these steps

  • Click on the Window+R keys from your keyboard simultaneously. A RUN window will open
  • Type “REGEDIT” and click on OK. A registry editor window will open
  • Click on File > Export, Choose desktop to give a file name and make sure you select ALL under export range at the bottom and then hit save. A backup file will be there on your desktop.
  • Once after we take the backup successfully. We will start to repair the registry now. Make sure you got your Windows Boot CD ready.
  • Open settings and go to Update and recovery. At the recovery tab, click advanced startup and then click Restart Now.
  • Insert the Windows Operating system image CD while your PC restarts and select the Troubleshoot option
  • At the Advanced Options screen select the Automated Repair option
  • Choose an account and log in, when prompted to do so.
  • Automatic repair may start now and your Pc will reboot during this process.

Once after the successful repair now insert the USB stick and check the encrypted files. If the virus still exist you need to go with an automatic removal. This can be done with the help of malware removal tools.

Automatic decryption Removal Tools

If the above manual method fails to remove virus files from your PC you can check with removal tools available in the market. All you need to do is a simple google search. You can find many tools online but I will note some of them below.

1. SPY HUNTER malware removal Tool

2. Emsi soft Decryptor by DJVU

3. Hitman Pro

4. Malware Byte Anti ransomware

I haven’t personally tested all these tools. So check the reviews and buy the best and affordable tool for you. Most of them promise to remove the Ransomware. Instead of paying the ransom to an unknown buy any tool and unlock all your files. This is how to decrypt files encrypted by ransomware.

In case if you got any queries, suggestions or know any other tool , a method by which you are able to successfully remove the HETS virus do let our readers know in the comments section below. Thanks for reading sharing is caring.

Filed Under: How to Tagged With: Hets file, Hets file recovery software, how to decrypt files encrypted by ransomware, What is hets file

  • « Previous Page
  • 1
  • 2
  • 3
  • 4
  • …
  • 6
  • Next Page »

Join GUIDEMETECH.COM now

Be the first to get every post to your inbox. Never miss an update from us

Softwares

Best Video Editor App for PC | CyberLink Power director free Download

In this … [Read More...]

Best PDF editor for windows 10 |Ashampoo Pdf Pro 2 Download

If you are … [Read More...]

More Posts from this Category

Recent Posts

  • Fire Stick not working? Here’s what you can do
  • Turn off this call is being recorded Announcement on Android
  • How to record incoming call on iPhone without app
  • Something went wrong please try again later Instagram error solution
  • Do your mouse automatically double clicks? Here’s a fix

Categories

  • Android (4)
  • Gadgets (8)
  • How to (38)
  • IOS (5)
  • Mac OS (2)
  • Softwares (2)
  • Windows (2)

Copyright © 2025 · News Pro Theme on Genesis Framework · WordPress · Log in