• About Us
  • Contact Us
  • Disclaimer
  • Privacy Policy
  • Terms and conditions

Guide Me Tech

Your guide in every aspect of Technology

  • Home
  • How to
  • Android
  • IOS
  • Mac OS
  • Windows
  • Gadgets
  • Softwares

How to reduce PDF file size without losing any quality

June 13, 2020 by admin

Hello guys, today in this guide I am gonna write about how to reduce pdf file size without losing any quality. Most of you have been filling forms, Job application where they limit the upload size of a PDF file to certain Kb or Mb. Beyond that, your upload will not be accepted and you will be greeted with an error message that your form is not accepted.

Today I had also gone through the same problem and after searching for the pdf compressing tools over the internet. I found different ways to compress the size of a Pdf file. So without wasting any time let’s walk through the guide.

Reduce Pdf size using Adobe Acrobat

Well, many of you will be familiar with this tool. But most of you may not know that we can reduce Pdf file size using this tool. Yes, you read that right. Without wasting any time let’s get to know how to reduce the size of a pdf file using an adobe optimizer tool

  • Open the Pdf file which you want to reduce the size in adobe acrobat reader
  • Now click on the tools option on the top
  • In the search bar, you can either search for optimize Pdf or scroll down and click on the Compress Pdf option.
  • In case if you are using a free version of adobe acrobat you need to purchase the product.
  • Now select Reduce File size in the top menu
  • Set compatibility of the tool.
  • Select advanced optimization in case if you want to make updates to image and font.
  • Now while saving your file you can rename the file or save it with the same name. It will be saved in your desired location.

This is how you can decrease the size of a Pdf file without losing any quality. Not only adobe acrobat there are a lot of tools from different companies that you can try. One among them is Ashampoo Pdf Pro. This amazing tool will also compress your pdf files with ease. I will update this compression guide using Ashampoo Pdf pro once I get to know more about it.

Adobe Photoshop Comes Handy!

Well, most of you may not be familiar with this tool. But when it comes to reducing the size of the Pdf it comes handy. You don’t need to be an expert graphic designer in order to compress the size of a Pdf file. Guys with basic knowledge will also be able to do it. All you need to do is simply follow these steps

  • Open the PDF in Adobe Photoshop
  • Click on Image option in the top menu bar and then select the image size option from the drop-down menu
  • Enter the different sizes until you get the size of your choice.
  • You can also decrease the size by using the Transform tool. You can simply do it by clicking Ctrl + T from your keyboard
  • A selection will appear around the corners of PDF file. You can reduce the file to the size of your choice.
  • Once you are done you need to deselect the transform by clicking Ctrl + D at the same time.
  • Now you can save the file.
How to reduce PDF file size

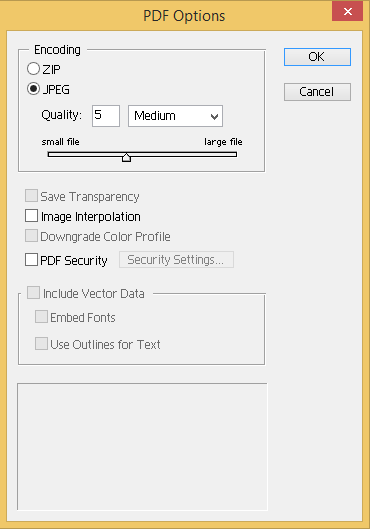
Once you are done make sure you adjust the quality while saving the file. Refer above image if you can’t find the option.

Reduce the size while you save the file in MS word

Instead of going through all these hardships of reducing the size of a PDF file. You can simply save the file in minimum size. This will cut down your efforts of compressing a file. While you save your document into PDF in MS word simply follow these steps

  • Once you are done with your work in MS word and while you proceed to save. Click on Ctrl + Shift + S
  • In save as type menu Select PDF format and click on Minimize size which is on the left side of your screen before you hit the save button.

This is how we can save PDF in a lower size. This guide will work only if you are composing the PDF else you can’t edit a PDF file that someone has sent to you.

Did you try the online tools?

Now we have known about some of the offline tools that help us compress pdf files. let’s get to know about online ones. There are a lot of online tools that promise to reduce the size of a pdf file but most of them will end in decreasing the quality. Just google them you can find a lot of tools online. I have tried some tools and I have got satisfactory results.

Reducing the size of a PDF file is not a time consuming process. All you need to have is a good data plan. You need to upload the file into the portal and they will convert for you. But the data might saved into their servers. That’s why I won’t prefer the online tools when it comes to privacy.

Final word

You can choose any of the above-mentioned ways to reduce the size of a PDF file. If you are successful in reducing the size with some other tool let us know by simply commenting in the comments section below. This will help us as well as our readers to know more ways of compressing. Thank you sharing is caring

Filed Under: How to Tagged With: how to compress size of a pdf file, How to reduce PDF file size, Reduce pdf file size online

How to get twitter fleets in android and iPhone

June 10, 2020 by admin

If you are a twitter user then here is a guide on how to get twitter fleets. Twitter introduces a cool new feature called twitter fleets which can help you communicate with your friends and followers. Twitter fleets, next evolution in twitter conversation will help brands to communicate with their followers amidst coronavirus pandemic.

what are fleets

Just like Facebook and Instagram stories, fleets are also the same. In short, we can say that Twitter fleets are nothing but disappearing tweets. A brand or a user can share his thoughts or feeling in a text, photo or video format in his fleet. They won’t get any retweets, public replies. Their followers can reply with direct message or with an emoji. Users can see the fleets at the top of his timeline.

How to get twitter fleets

They will stay there for 24 hrs and then disappear. Fleets are considered to be a quick and short way of conversation. After a successful release in brazil, twitter is planning to release twitter fleets globally.

Get instantly by just updating your twitter app

In case if you are a twitter user residing in Brazil, Itay and India you can get twitter fleets by just updating your twitter app. Whether you are an android or iPhone user just updating your twitter app will serve you twitter fleets. If you have got good data plan updating your twitter app will be done in a minute. Users globally have to wait as twitter announces that fleets will be available for them soon. Global release date will be announced soon.

Also Read: How to change youtube channel name

Create your own fleet now

Just like Facebook, Instagram stories twitter users can now share stories that will last for 24 hrs. All you have to do is simply follow these steps in order to create your own fleet

  • Click on your profile pic in order to create a fleet
  • Type your content, you can also add an image or video in your fleet
  • In case if you think of adding a video then you can only upload a video which 2 min 20 secs in length.
  • Tap the fleet option on the bottom right to post.
  • You can see people who has watched your fleet and all the replies to your fleet will appear in your inbox.

This is how you can create your own fleet. Your fleets are not public and will be visible only to your followers. This is how to get and create twitter fleets. Hope you are excited to post your first fleet. If you got any queries or suggestions do let us know in the comments section below. Thank you sharing is caring.

Filed Under: How to Tagged With: How to create a twitter fleet, How to get twitter fleets, How to use twitter fleets

how to change youtube channel name

June 5, 2020 by admin

Hello guys, today I am going to write on how to change channel name in youtube. This guide is useful for Video content creators on Youtube who has a channel in it. With over 31 million channels, youtube is the world’s best online video sharing platform. Last year this number grew by 25%. Every minute 500 hrs of video gets uploaded on youtube. If you too own a channel and don’t know how to change your youtube channel name after a then this guide is for you

This is how to change a youtube channel name.

I already know that you are looking to change your youtube channel name and that’s why you are here. So Without wasting any time let’s get to know

  • login to your youtube channel and click on to your profile icon on the top right side.
how to change youtube channel name
  • Click on your Settings
  • Now you will be directed to your channel settings where you need to click on Edit on Google
how to change youtube channel name
  • Now if you have a personal account you can enter first name and last name.
  • In case if you have a brand new account there are multiple fields for you where you can use multiple words for your channel name.
  • Click Ok and finalize the name

Note: In case if you have a personal account changing name will reflect in all your Google products. If you don’t want the name to reflect on all your google products then simply connect to the brand account. Not only you have a different name but also you can have multiple managers with the brand account.

Also Read: How to Import contacts from Gmail to iPhone

Here are some criteria that you consider before changing a youtube channel name. In case if you had created your account more than 2 weeks ago, you can change your name up to 3 times in 3 months. If you created your account for less than 2 weeks you can change your name more often. Also, don’t make your youtube channel name complicated. The simpler, the quicker people will remember your channel name.

One small suggestion to my readers don’t change your youtube channel name before you are not ready. Think twice and make sure which name fits your channel name. This is how to change the channel in youtube. If you got any queries, suggestions or got stuck in the middle of the process do let me know in the comment section below. I will revert back asap. Thank you sharing is caring.

Filed Under: How to Tagged With: How to change a youtube channel name, How to change my youtube channel name, How to change your youtube channel name, how to change youtube channel name

How to import contacts from Gmail to iPhone

June 2, 2020 by admin

In this guide, iPhone users will get to know how to import contacts from Gmail to iPhone. This article is useful for those who got a new iPhone or the one who switch from Android to IOS. We know Apple is unique in adding amazing functionality to its users. Most of the new technologies are introduced in apple devices. let’s get into the topic. You can add contacts from Gmail to iPhone only if you have exported contacts from your old device earlier.

I mean if you got contacts in Gmail you can import them to your iPhone. If not then you can’t. Make sure you save contacts to your Gmail. You need to backup or export contacts to your Gmail account before we start importing into iPhone. Once after you finished off saving contacts to Gmail you can follow these steps in your iPhone.

Import contacts from Gmail to iPhone

Now you have got iPhone in your hand you can import contacts from Gmail to iPhone by simply following these steps. Make sure you have an active internet data plan else connect to a wifi connection

How to import contacts from Gmail to iPhone
  • Open Settings app in your iPhone
  • In settings open Accounts & Password
  • Click add Google account & select Google account
  • Enter email & password and tap on Next
  • Turn the Option contacts ON
  • Click on the save option which is present on the top.

This is how you can sync contacts from Gmail to your iPhone. In case if you got any issues while syncing contacts you can follow below steps

  • Open settings in your mobile
  • Now go to Contacts and Tap on accounts
  • Tap on Google account and switch contacts ON
  • Now Tap on the account and one
  • Try adding your account now.

Also Read: How to clear personal information from the Internet

Still, if you can’t import contacts then there might be a problem with the data connection. First, rectify it and then start again. Also, it takes some time to import the contacts from Gmail to your contact list. Don’t panic if it takes time to import. This is how to import contacts from Gmail to iPhone. In case if you got any queries or issues do let me know in the comments section below.

Filed Under: How to, IOS Tagged With: How to add contacts from Gmail to iPhone, How to import contacts from Gmail to iPhone, How to sync contacts from gmail to iPhone

How to remove personal data from the internet

May 31, 2020 by admin

Hello guys, today I am back with one more interesting topic on how to remove personal data from the internet. This guide will be helpful for those who get annoyed with the online marketing calls and emails that try to sell some unwanted stuff. If you are reading this guide you might be looking to go private instead of public. Without wasting any time let’s get to know about it.

1. Make your Social accounts private else delete

Before we start, the first thing we have to do is to make our social accounts private. Data like mobile number and email are easily accessible if your profile is public. Companies, data brokers collect data of a person mostly by the use of scraping technique. They simply scrape the profiles with the use of some data scraping tools as well as manual collection. These tools will fetch details like Name, Email, profile pic, address from the profiles.

If you make your social account private there is a less chance for these tools to gather data. Even if humans are employed to collect data they will fail to collect. In case if you are using Facebook here’s a guide I wrote earlier on How to lock your Facebook profile. You can simply follow this guide to make your profile private. If you think your data is still getting accessed then simply delete that profile in case if you want to go private.

2. How to remove personal data on blogs and websites

While most of the blogs won’t publicize their user database but in case of a data breach by a fraudster, your details will get public. Any sensitive information like Name, email, address, Credit card and bank account details will be sold online. In such a case, you need to contact the webmaster and ask him to delete your sensitive information after a sale or purchase from that website.

Also don’t save a credit card in the shopping websites. You can take legal action against the owner of the website if he refuses to delete your details. If you have participated in an online survey program or entered your personal information in a data collection site then opt-out from it.

In case if you own a blog or website and want to go private then you have to delete that blog or website. I think bloggers and website owners know better than me. If you are unsure whether your details are online or not you can verify by simply doing a quick name search in the websites like Spokeo and people finder.

3. Remove personal image from internet

If your image is available online you can contact the webmaster of that particular website where your image was published. In case if the publisher doesn’t remove the image you can file a case against him. Google is the most used search engine worldwide. If you find your image in the search results you can contact google and urge them to take down the image from the search results.

Also, copy the URL of the image link and then contact Google and ask them to remove the image. Google will surely help you if show the legal copy which you have filed against the publisher. You can find more information on the google support page. Google will take down the image for sure.

4. Accept cookies only if required

Companies use cookies to collect user information and monitor their behaviour online. With the help of browsing history, the user intent and his behaviour can be guessed. If you are looking to buy a product online, ads regarding the product from different brands will pop up. This is possible with the help of cookies. These cookies will be active for 1 minute, 24 hours and even 30 days.

Also Read: Windows photo viewer can’t display this picture issues

Fraudsters will also make use of these cookies to gather your personal information and other financial details. They will do whatever they want in order to get some bucks. They can even sell your data to others. Make sure that you accept cookies from the trusted sites only.

5. Don’t install apps from unknown sources

If you are a mobile user make sure you don’t install apps from unknown sources. Once after you install an app it will ask you to allow for the access to your contacts, photos and much more. Always try to install apps from known and trusted sources.

Mobile phones usually won’t allow installation of apps from unknown sources. There is an option where you have to enable installation from unknown sources. I suggest you refrain turning this option ON.

Final Word

Someone said it and said it right. Prevention is better than cure. In order to remove personal data from the internet, first of all, you should not share your data on the internet. Use VPN and incognito mode in order to protect your privacy. Install internet security and anti-virus software on your PC and Tablet.

If you don’t want to all this hectic process of removing personal information from the internet you can hire an agency. There are many agencies that remove personal data from the internet on behalf of you. They will charge some bucks and your work will be done.

If you got any problem, queries or suggestions do let me know in the comments section below. I will get back to you as soon as possible. If any of your friend or relative doesn’t know how to remove personal data from the internet or in need then simply share this article with them sharing is caring.

Filed Under: How to Tagged With: How to delete personal data from internet, How to delete personal information from internet, How to remove personal data from the internet, How to remove personal image from google, How to remove personal information from internet

Windows photo viewer can’t display this picture issues solved.

May 28, 2020 by admin

Hello guys, today in this post I am gonna write about different types of windows photo viewer can’t display this picture issues. In case if you are not able to open the Image files and they start throwing this error. You can simply follow this guide to rectify the issue. Simply follow this guide till the end and make sure you fix the issue in your PC.

1. Windows photo viewer can’t display this picture because there may not be enough memory available

  1. If you get this error message while you click on an image file then simply follow these steps
  • Click Start > Control Panel > Control Panel Items > Display > Screen Resolution >Click advanced settings.
  • Click Color management, under devices tick use my settings and delete the color profile associated with the device.

In case if you have two displays select the right one and then follow these steps

  • Right Click on desktop > screen resolution > advanced settings > color management > color management > and choose the right display and then delete the profile associated with this device

In case if you don’t have any colour profile then simply tick the “use my settings” checkbox and then add an RGB Color profile. The ones that are required will not get removed.

2. Another solution is to check the C drive or any other drive where you have installed windows make sure it has enough space in it. Delete all the unnecessary files that are present in the drive and free up enough space.

2. When you don’t have the correct permissions to access the file location

If you are getting this issue then simply follow these steps

  • Right click on the image which does not gets opened and displays error
  • Under the properties click on Security tab
  • Click on Administrators, click on the admin account on your PC
  • A new advanced security settings window will open under which check for the type if access is denied then you have to enable the access.
  • You can do it by click on the admin account and enable full control by checking all the boxes.
  • Once after you are done checking the boxes make sure you click the apply button

Now try opening the file it will open now. The reason for this error is the denial of permissions to open the file.

3. When the file appears to be damaged, corrupted and is too large.

If you are getting this sort of error message then it is obvious that the files are corrupted. Some of you might face this error and for those who get it simply repair the files by using any image repair tools.

In case of damage, corrupt images you can use JPEG Repair Toolkit. The trial version of this toolkit also serves our purpose. All you need to do is simply download this from google and start repairing the images. You can also go for some online tools which promise to repair corrupted images. Here I have linked one site. I haven’t personally used these tools. It’s up to you whether to go with an online or offline tool.

4. When it doesn’t support the file format, or you don’t have the latest updates to photo viewer

In case of this error you have to change the file format. If your file is in Jpeg format and you are getting this error then simply convert to any other format like PNG, TIFF, Bitmap etc. This is will solve the issue.

Also, make sure that your windows photo viewer is up to date. You can check for any updates by simply following these steps

Windows photo viewer can't display this picture issues
  • Click on start and then choose Settings
  • Under settings select Update & Security and click on windows update
  • Select check for updates
  • Also, check the box next to the windows photo viewer and click install updates.
  • Restart your Pc once you are done with the updates.

This is how you can solve when Windows photo viewer can’t open a picture because Photo Viewer either doesn’t support this file format, or you don’t have the latest updates to photo viewer

5.windows photo viewer can’t open this picture because the picture is being edited in another program

This error will appear in case if there is any conflict with other photo editing software. All you need to check whether the picture is being used in any other software and then close it. Softwares like mobile phone suites will conflict with the windows photo viewer hence resulting in this error.

Common solution:

If you are facing any of these errors while opening a picture then simply try with any other photo viewer software. I got Adobe Photoshop software installed on my PC. I use it whenever I get such errors. In case if the saved files from adobe Photoshop displays the same error then simply take a screenshot while the picture is open in the Photoshop software.

Also Read: Google plays store sign in button not working

In case of corrupted files even Photoshop won’t open those files. You need to repair them at any cost. These are the common Windows photo viewer can’t display this picture issues and their solutions. If you got any queries or suggestions do let us know in the comments section below. I will get back to you as soon as possible. Thank you sharing is Caring.

Filed Under: How to Tagged With: Windows photo viewer cannot display this picture issues solved., Windows photo viewer cannot open pictures

Fix Google Play store Sign in button not working issue

May 24, 2020 by admin

Hello guys, today in this article I am going to write on how to fix google play store sign in button not working issue. My brother was facing this issue on his mobile and approached me to fix it. The green button that asks to sign-in does not work even if you click on it.

For this issue, we have to know what’s causing it and fix that thing first. The google play store sign-in button not working issue will automatically get solved. Here are some of the common issues by which you will not be able to login to play store.

1.Check your internet and Time settings in case the google play store sign in button does not work

Make sure you have got an active data plan in your mobile else connect to a wifi network and then try signing in. The Google sign-in button won’t work if there is no or poor internet connection.

Google Play store Sign in button not working

Also, check your date and time settings make sure they are properly working. If your time zone settings differ with the actual settings then also the sign-in button won’t work. So make sure you enable the automatic date and time settings to your time zone.

2.Check for any software update

First of all check for any software update on your mobile. In case if there exists any update do it at the earliest. Here is how you can check for any software update on your mobile.

  • Go to settings in your mobile
  • Now in the About phone section
  • Check for any system update and click on update.
software update in android

You can do this update either on wifi network or the data of your mobile network. Usually, most of the mobile brands allow system update over wifi networks. Sometimes you may get notification regarding system software update. Don’t ignore it update your system software as soon as possible whenever you get this notification. It may be hardly around either 1 or 2gb in size depending on the brand.

Check the Google play store sign in button. It will start working now. In my brother’s case, it was a software update that was causing the issue. He was able to sign in as soon as he updated the system software.

3.Clear cache and data of google play store

In case if you are still not able to sign in google play store. Try deleting cache and data of google play store. You can do this by simply following these steps

Google play sign in
Image Credis Fonepaw
  • Go to settings
  • Open apps and then click on manage apps
  • Clear cache and data of Google play store services

Once after you clear cache and delete the data try checking the sign-in button. It may start working now. Else follow the next step to make sure the google play store sign-in button works.

Also Read: What’s google hangouts and how to use it

4.Install latest version of google play store

Make sure you have got the latest version of google play store installed in your mobile. If there is any update available kindly update it at the earliest. Also, check the Google play store services and clear data and cache if clearing the data of google play store won’t work. In case if the sign-in button won’t work even after clearing the cache of play services then try disabling and enabling the play services.

This is how to fix google play store sign in button not working issue. In case if you got any queries or suggestion do let me know in the comments sections. Do share it with your friends, near and dear ones who are in need.

Filed Under: How to Tagged With: Google Play store Sign in button not working

How to lock Facebook profile in 3 simple steps

May 21, 2020 by admin

Hello guys, in this guide I am going to write on How to lock Facebook profile. Most of the Facebook users who wants to limit the view of their profile content will use this trending feature. When a user locks his profile only their friends will be able to see the posts, stories they share. Unknown persons can’t view the profile and its posts anymore even though any posts that are shared in the past are public.

If you are looking forward to lock your Facebook profile simply follow this step by step guide.

1. Login to your Facebook Profile and keep your post visibilty to friends

First of all login to your Facebook account and then go to your profile. Now in the post section change the privacy of your posts from the public to Friends. You can do it by simply while you create a post, click on the option PUBLIC which is present on the sample text “What’s on Your Mind” written on the text field.

How to lock facebook profile
Choose Friends option to see your posts

A new screen will appear like this. All you need to do is check friends option and then hit back. Now your posts will be visible to your friends only.

2. Change the Activity of your profile to Friends and Friends of Friends only

Now once you set the privacy of your posts to friends. Its time to change the privacy of your profile to friends. You can do it simply by following these steps

  • If you are using the Facebook app for Mobile click on the three lines present next to the notification icon.
  • Scroll down and click on the Settings and Privacy option.
  • Under that click on the Settings
  • Now account security, security and privacy options will appear on your screen. Scroll down a bit and click on the Privacy settings
How to lock facebook profile
Click on Privacy Settings
  • Under activity change each and every option to either friends or friend of friends.
  • Check below image for reference
How to lock facebook profile
Everything should be changed to either friends or friend of friends
  • Once after you change these options come back to privacy and click on the Timeline and Tagging option.
How to lock facebook profile
Everything should be changed to either friends or friend of friends
  • Change everything to either friends or friend of friends. Also under review turn both the options ON.

That’s it you have changed the activity of your profile to friends and friends of friends only. Now come back and follow the next step.

3.Search for Profile Lock in Help & Support Section

Once you are done with the above steps now go to the Help & Support section in the search box type Profile Lock in the search bar.

How to lock facebook profile

Click on the link that reads “How do locked profiles work on Facebook”. Once after you click an article you will be guided to an article. Now scroll down a bit and look for the option How do I lock Facebook Profile?. You can find an option named Tap Here below. Simply click on it. You will be asked whether you are looking to lock your Facebook. Click on Lock your Profile Option. Your profile will get locked.

Try it the simple way

I am updating this post with a new method to lock your Fb profile. It is a new and simple way to lock your profile. Here is how you can do it. If you land on a profile which is already locked you can simply click on their profile scroll down a bit and click on the see more options and you can find an option to lock your profile too.

I am not able to take a screenshot of the same as Facebook won’t allow taking a screenshot of the locked profile. So this is a very amazing feature regarding the safety of a Facebook user and his privacy.

How to unlock your Facebook Profile?

If you want to unlock the profile once after you lock then simply check for the how to unlock Facebook profile and then tap unlock my profile. You can also do it from your profile section where you need to click on More option then tap on Unlock. Your profile will get unlocked. That’s it this is how to lock Facebook profile.

Also Read: How to add someone on whatspp from a different country

Right now this facebook lock option is rolled out in some countries. Not everyone will be able to lock their profile. In case if this doesn’t work for you simply try to update your Facebook app and then follow the mentioned steps above. You will be able to lock your profile. If you got any queries do let us know in the comment section. Thank you sharing is caring.

Filed Under: How to Tagged With: How to change my posts from public to private, How to change privacy settings in my facebook profile, How to lock facebook profile

What’s google Hangouts and how to use it

May 15, 2020 by admin

Hello guys today’s post is on What’s google hangouts and how to use it. If you are looking for a free online meeting app or conference app. Then Google hangouts will be another alternative. In this guide, I am going to write on how to use google hangouts. So without wasting any time let’s get to know about google hangouts and how to use it.

What’s google hangouts?

Google Hangouts is an app which is used to text, voice or video call to a person or a group of persons. It means it an online meeting or conference app which lets you connect with others and share your thoughts and feelings. Developed by Google LLC this app is one of the most used worldwide with 45,27,414 downloads.

Features:

There are some cool features in google hangouts which most of the users enjoy. Here they follows

  • Group chat up to 150 contacts
  •  Share status messages, photos, videos, maps, emoji, stickers, and animated GIFs
  • Make a live free video call up to 10 contacts
  • Call any number with free of cost.
  • With the help of a google voice account, you can make calls, text and send voice mails.
  • Sync chats with almost all your devices that include Android, iOS, Windows and Mac.
  • Send messages even if the user is offline.

Calls to Hangout users is free but other calls might be charged according to your ISP. Check google hangouts country-wise calling Charges here

How to use google hangouts on android

Android users can get this app from google play store. Here is the link of this app Google hangouts apk download for android. Once after successful download, you can install it on your android device.

For Android:

  • For the first time, when you open the app you are asked to allow google hangouts to access photos, microphone etc.
  • Now if you want to make a call tap the + icon on the bottom right of your screen.
What's google hangouts
  • You can select a new video call or Start a New Conversation.
  • In case if you select the chat option a list of contacts will appear. Tap on the contact you are willing to chat. You are ready to go now.
  • If you click on the menu icon, the three dots on the top right of your screen some options will appear like 1)People 2)Options 3)Create new Group 4)Add to Home Screen etc.
  • If you want to add the person along with some group of people click on the option named PEOPLE
  • In the options, you can view the chat history and delete it in case if you want to.
  • Under Create a new group option you can Name a group with all your friends in the contact list and share updates.
  • You can also add hangouts as a shortcut to your home screen.
  • If you want to make a video call then simply tap on the contact and then click on the video call icon.

This is how you can download and use it on android. This lightweight app will let you overcome your need for an online conference app.

Also Read: How to enable cookies on Android

How to use google hangouts on iPhone

If you are an iPhone user and wants to use Google hangouts in your iPhone then simply head to the Apple app store and download it in your iPhone. Below I am giving you the link from where you can directly download the app in your iPhone

Click here for Google hangouts for iPhone

Now once after the successful download, all the user interface of the app and the options are the same as in the android app. If you got any issues or queries do let me know in the comment section below.

For PC:

Either you are a Windows or Mac user no matter which user you are. If you are using google chrome then you can add a google chrome extension to your browser. This extension will let you send messages, make video and phone calls, share photos.

Here is how you can get the chrome extension. Click on the link below to download the extension

Hangouts for PC

Once after successful download click to add chrome and then hit add. The extension will be added to your chrome browser. Now you can click and choose contacts and start making a group call and chats. This is how you can get it for Windows as well as Mac.

If you got any queries or suggestions on do let us know in the comments section below. we will reply as soon as possible. Thank you sharing is caring.

Filed Under: Android Tagged With: google hangout uses, google hangouts, what is a google hangout

How to do a barcode scan on iPhone

May 12, 2020 by admin

Today I am going to write on another interesting topic on how to do a barcode scan on iPhone. After reading this guide, I hope you will successfully know how to scan a barcode using your iPhone. Well, we all know what a barcode is and most of the people might know about it. Yet for those who don’t know what a barcode is here are a few lines for them.

A barcode is a visual form of representing data in the machine-readable form. You can find it in the form of vertical lines on most of the packages, electronic goods etc. Different barcodes carry different data and they just vary in the width and spacing of the parallel lines.

Barcode scanner apps for iPhone

Usually, the iPhone doesn’t come with an inbuilt barcode scanner. However, some third party barcode scanner apps will let you scan barcodes on your iPhone.

How to get barcode scan on iPhone

We know that iPhone doesn’t have any inbuilt barcode scanner. Don’t take QR code scanner to Barcode scanner both are different. You can scan a QR code simply with your camera but you can’t scan barcodes with it. Now you got a question in your mind that how to scan a barcode with an iPhone. Well for this purpose we have to download third-party apps from the AppStore. Here are I am going to discuss third party barcode scanners for iPhone

Also Read: How to copy files from Mac to USB drive

Some third-party apps for you:

  1. Qr Reader by Tap Media Ltd: This QR Code Reader app by the scan will let you scan QR Codes, puzzles, business cards as well as barcodes. It will help you scan the retail barcodes and provide useful information about the product. You can get it from the app store here Barcode scanner for iPhone
  2. QR Code Reader & QR Scanner by Mixer box Inc: This is also one of the barcode scanner apps for iPhone. This app will let you scan the barcode and provide useful product details. You can also browse the product details on Amazon, eBay by scanning the barcode. You can get this app from the Apple app store.
  3. QR Code Reader by Tiny Lab: This is also a QR Code and barcode scanner. It has multilingual support and requires iOS 9 and above. You can get this app from the apple app store or get it from here Qr code Reader Barcode scanner for iPhone
  4. Barcode Scanners by Cognex Corporation: This free barcode scanner app will add barcode scanning functionality inside other apps that are present on your iPhone. You can create your own barcode scanning app with SDK provided by this app. For more info visit this link Barcode scanners for iPhone
  5. Scandit Barcode scanner by scandit AG: This powerful free barcode scanning app can scan almost all types of barcodes. From retail codes to 2d codes it will scan everything for you. You can download scandit Barcode scanner from this link.
Barcode scan on iPhone

Final Thought :

There are a lot of apps that are present in the Appstore. I have mentioned only a few of them. After reading this article I hope you can do a barcode scan on iPhone now. If you got to know about any other app that I have not mentioned here. Do let us know in the comments section below. Our readers can know more about such type of apps. Thank you Sharing is Caring

Filed Under: How to Tagged With: Barcode scan on iphone, barcode scanner apps for iphone, barcode scanner for iphone, barcode scanning feature in iphone

  • « Previous Page
  • 1
  • 2
  • 3
  • 4
  • 5
  • 6
  • Next Page »

Join GUIDEMETECH.COM now

Be the first to get every post to your inbox. Never miss an update from us

Softwares

Best Video Editor App for PC | CyberLink Power director free Download

In this … [Read More...]

Best PDF editor for windows 10 |Ashampoo Pdf Pro 2 Download

If you are … [Read More...]

More Posts from this Category

Recent Posts

  • Fire Stick not working? Here’s what you can do
  • Turn off this call is being recorded Announcement on Android
  • How to record incoming call on iPhone without app
  • Something went wrong please try again later Instagram error solution
  • Do your mouse automatically double clicks? Here’s a fix

Categories

  • Android (4)
  • Gadgets (8)
  • How to (38)
  • IOS (5)
  • Mac OS (2)
  • Softwares (2)
  • Windows (2)

Copyright © 2025 · News Pro Theme on Genesis Framework · WordPress · Log in